

How to start a blog with your own domain for $50 (the simple Substack setup)
Start a professional blog on Substack with your own custom domain. One-time $50 fee, $12/year for the domain, zero maintenance. Here's the complete setup guide.


Why Substack for your blog
You want to start a blog. You have ideas to share. You want a place that looks clean and works on every device.
Substack gives you that.
What Substack does
Substack is a writing platform built for people who want to publish without managing infrastructure.
You write posts. They get published on your blog. They also go out as emails to your subscribers.
Everything else is handled. Hosting. Design. Email delivery. Analytics. Subscriber management.
You write. Substack handles the rest.
What makes it simple
The editor is clean. Headings, bold, italics, links, images, embeds. That’s it.
No page builders. No shortcodes. No widgets to configure.
Your blog is mobile-friendly by default. No responsive design tweaks needed.
Every post you publish can go out as an email newsletter. Automatic. No separate email tool required.
Analytics show you what matters. Post views. Subscriber growth. Email open rates. No dashboard overload.
Comments are built in. Readers can respond. You can reply. Simple conversation.
No plugins to install. No security updates to run. No hosting bills. No backup systems to set up.
You focus on writing. Substack keeps everything running.
Who this works for
This setup works if you want to start a simple blog and publish consistently.
It works for your first blog. No technical experience required.
It works if you value simplicity over infinite customization options.
It works for newsletter writers who also want a website home for their content.
It works for anyone tired of spending weekends troubleshooting tech issues instead of writing.
Who should look elsewhere
If you need heavy design customization beyond colors and fonts, Substack will feel limiting.
If your blog strategy depends on complex features that require custom code or specialized plugins, you’ll hit walls.
If you plan to make money primarily through display advertising rather than subscriptions or sponsorships, Substack is not built for that.
If you need membership tiers beyond what Substack offers natively, you’ll want more control.
The core difference
Most blogging platforms give you a thousand options. Substack gives you the twenty that matter.
That trade works when your goal is to write and build an audience, not to become a web developer.
If that sounds right, keep reading. We’ll walk through the complete setup next.
Why you need your own domain
When you create a Substack blog, you get a free URL immediately.
It looks like this: yourname.substack.com
That works fine. You can start publishing today. No setup required.
But there are good reasons to add your own domain instead.
The default setup
Your free Substack URL lives on Substack’s domain. The .substack.com part tells everyone you’re using their platform.
Nothing wrong with that if you’re just testing the waters or writing for a small group.
But if you’re building something you plan to stick with, a custom domain makes more sense.
Why add a custom domain
1. You own your web address
When you buy a domain, you own it. Not Substack. Not any platform.
If you ever leave Substack and move to another blogging platform, your domain comes with you.
Your links don’t break. Your search engine rankings transfer. Your audience follows you to the new home.
Platform independence matters when you’re building something long term.
2. It looks more professional
Compare these two URLs:
myblog.substack.com
myblog.com
The second one feels more established. More serious. More like a real publication.
Readers notice. So do people you pitch for guest posts or partnerships.
A custom domain signals you’re committed to this work.
3. You control your brand
Your domain is your brand’s home on the internet.
When people link to your posts, they’re linking to YOUR domain. Not someone else’s platform.
When you share your URL, it’s yours. Clean. Simple. Memorable.
4. Better for search engines
Every link pointing to your site builds authority.
With a custom domain, that authority builds for YOU. Your myblog.com domain gets stronger over time.
With a subdomain, you’re building authority for Substack’s main domain, not your own web property.
If you care about organic search traffic, owning your domain matters.
5. You can add other touchpoints
Once you own a domain, you can do more with it.
Set up a professional email address: hi@yourblog.com or yourname@yourblog.com
Create subdomains if you need them later: shop.yourblog.com or resources.yourblog.com
Add landing pages outside Substack if your business grows.
Your domain becomes the center of your web presence, not just your blog.
The tradeoff
Custom domains on Substack cost money.
Substack charges a one-time $50 fee to unlock the custom domain feature for your publication.
Then you pay for the domain itself. Most .com domains cost $10 to $15 for the first year. Renewals run $12 to $18 per year after that.
Total first-year cost: about $60 to $65.
After that: $12 to $18 per year to keep your domain.
When to add a custom domain
If you’re just testing whether you like blogging, start with the free yourname.substack.com URL.
Publish five to ten posts. See if you stick with it.
Once you know you’re committed, upgrade to a custom domain.
If you already know this is serious for you, buy your domain now before someone else takes it.
What happens to your old URL
When you connect a custom domain, Substack automatically redirects your old yourname.substack.com URL to your new domain.
Your existing links keep working. Search engines update their records. Subscribers see your new domain.
Nothing breaks. The transition is smooth.
Next step
If you’re ready to set up your custom domain, the next section walks through the complete process.
Domain purchase. Substack setup. DNS configuration. Everything you need.
Let’s get your blog live.
The complete setup process
Here’s what you need to start your blog with a custom domain on Substack.
What you’ll need
30 minutes of focused time.
A credit card for two purchases: your domain name ($10 to $15) and Substack’s custom domain unlock fee ($50).
Your blog name. If you don’t have one yet, we’ll help you pick it in the next section.
The five steps
This is the complete process from nothing to published:
Choose and buy your domain
Create your Substack account
Unlock custom domains on Substack
Connect your domain to Substack
Verify it works
Each step takes 5 to 10 minutes. We’ll walk through them one at a time.
Let’s start with your domain.
Step 1: Choose and buy your domain
Your domain name is your blog’s address on the internet.
Pick something you can live with for a while.
Picking your domain name
Keep it simple
Short beats long. Easy to remember beats clever wordplay.
If you have to spell it out loud to someone, make sure they’d know how to type it.
Avoid hyphens. Avoid numbers. Both cause confusion when people try to find you.
Match your content or your name
Personal blog? Use your name or initials.
johnsmith.com
jsmith.com
johnwrites.com
Topic-focused blog? Hint at what you write about.
marketingnotes.com
techexplained.com
dailydesign.com
Don’t overthink the match. As long as it’s in the ballpark, you’re fine.
Get the .com if you can
Most people default to typing .com when they remember a website.
If yourname.com is available, grab it.
If .com is taken, .co and .io work fine as alternatives.
Avoid obscure extensions like .xyz or .blog unless you have a specific reason.
Don’t overthink it
Your domain name matters, but not as much as the work you publish on it.
You can always buy a new domain later and redirect the old one if you change direction.
Pick something good enough and move forward.
Where to buy your domain
You need a domain registrar. That’s a company authorized to sell domain names.
Recommended registrars
Namecheap: Clean interface. Fair pricing. No aggressive upsells.
Porkbun: Cheap renewal rates. Straightforward process.
Google Domains: Simple setup. No extras pushed on you.
All three work well. We’ll use Namecheap for this guide since it’s beginner-friendly.
The buying process
Here’s how to buy a domain on Namecheap.
1. Go to the Namecheap homepage
Search for your desired domain name in the search box.
2. Check availability
Namecheap shows you if the domain is available.
If it’s taken, try variations. Add your middle initial. Try a different extension. Adjust slightly.
3. Add to cart
Once you find an available domain, click the cart icon to add it.
4. Go to checkout
Click “View Cart” then “Confirm Order.”
5. Enable WhoisGuard
This keeps your personal information private in the public domain registry.
Without it, your name, email, and address become publicly searchable.
Enable it. It’s usually free for the first year.
6. Skip the upsells
Namecheap will offer hosting, email, SSL certificates, and other add-ons.
Skip all of them. You don’t need any of it for Substack.
Just buy the domain.
7. Create an account
If you don’t have a Namecheap account, create one during checkout.
Use an email you check regularly. This is where domain renewal reminders go.
8. Complete payment
Enter your payment details and complete the purchase.
Cost breakdown
First year: $10 to $15 for most .com domains.
Renewal: $12 to $18 per year after the first year.
Some registrars offer deep discounts on the first year, then charge more for renewals. Check the renewal price before you buy.
What to do after purchase
Nothing yet.
You own the domain. That’s all you need for now.
Don’t try to configure DNS settings or point it anywhere. We’ll do that in Step 4 after you set up Substack.
Leave your domain registrar account open in a browser tab. You’ll need it later.
Common questions at this stage
“What if the domain I want is taken?”
Try these options:
Add your middle initial
Use your initials instead of full name
Try .co or .io instead of .com
Add a relevant word (johnsmithwrites.com)
Use a synonym for your topic
“Should I buy multiple domain extensions?”
Not necessary when you’re starting. Just get the one you’ll actually use.
If your blog grows and you want to protect your brand, you can buy other extensions later.
“What if I change my mind about the name later?”
You can buy a new domain anytime. Set up a redirect from the old domain to the new one. Your readers follow automatically.
Domains are cheap enough that changing isn’t a big deal.
Next step
You own a domain. Now let’s set up your Substack account.
Step 2: Create your Substack account
You have a domain. Now you need a Substack account to build your blog.
The signup takes about 5 minutes.
The signup process
1. Go to Substack
Open a new browser tab and go to substack.com
2. Start the signup
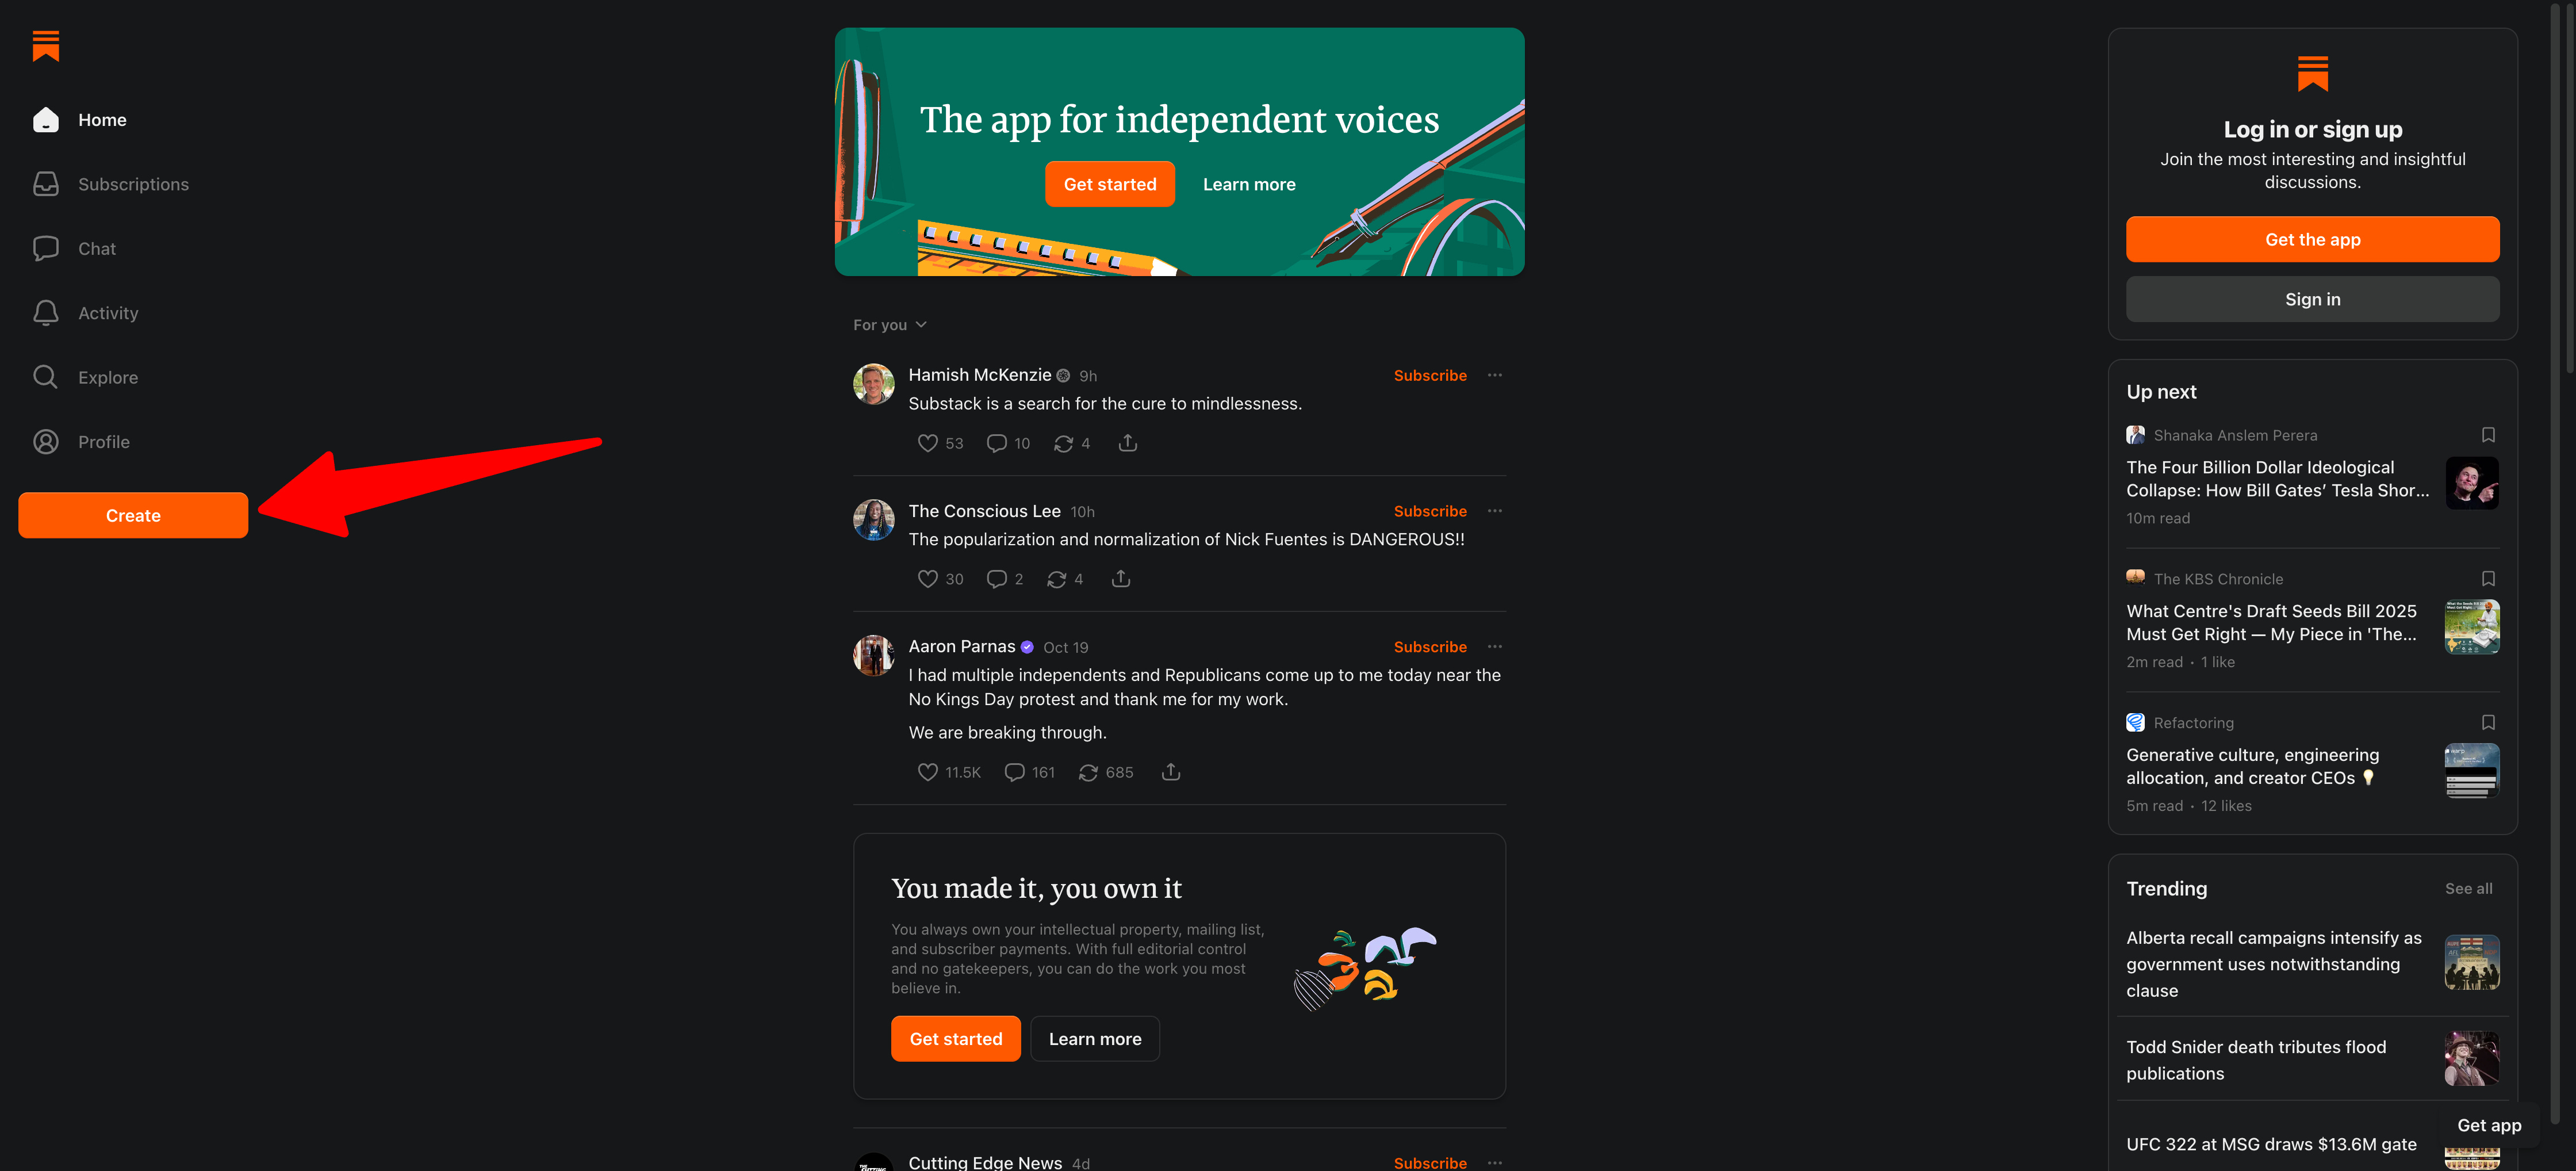
Click on “Create” on the homepage.
3. Create your account
A popup will appear asking you to sign in.
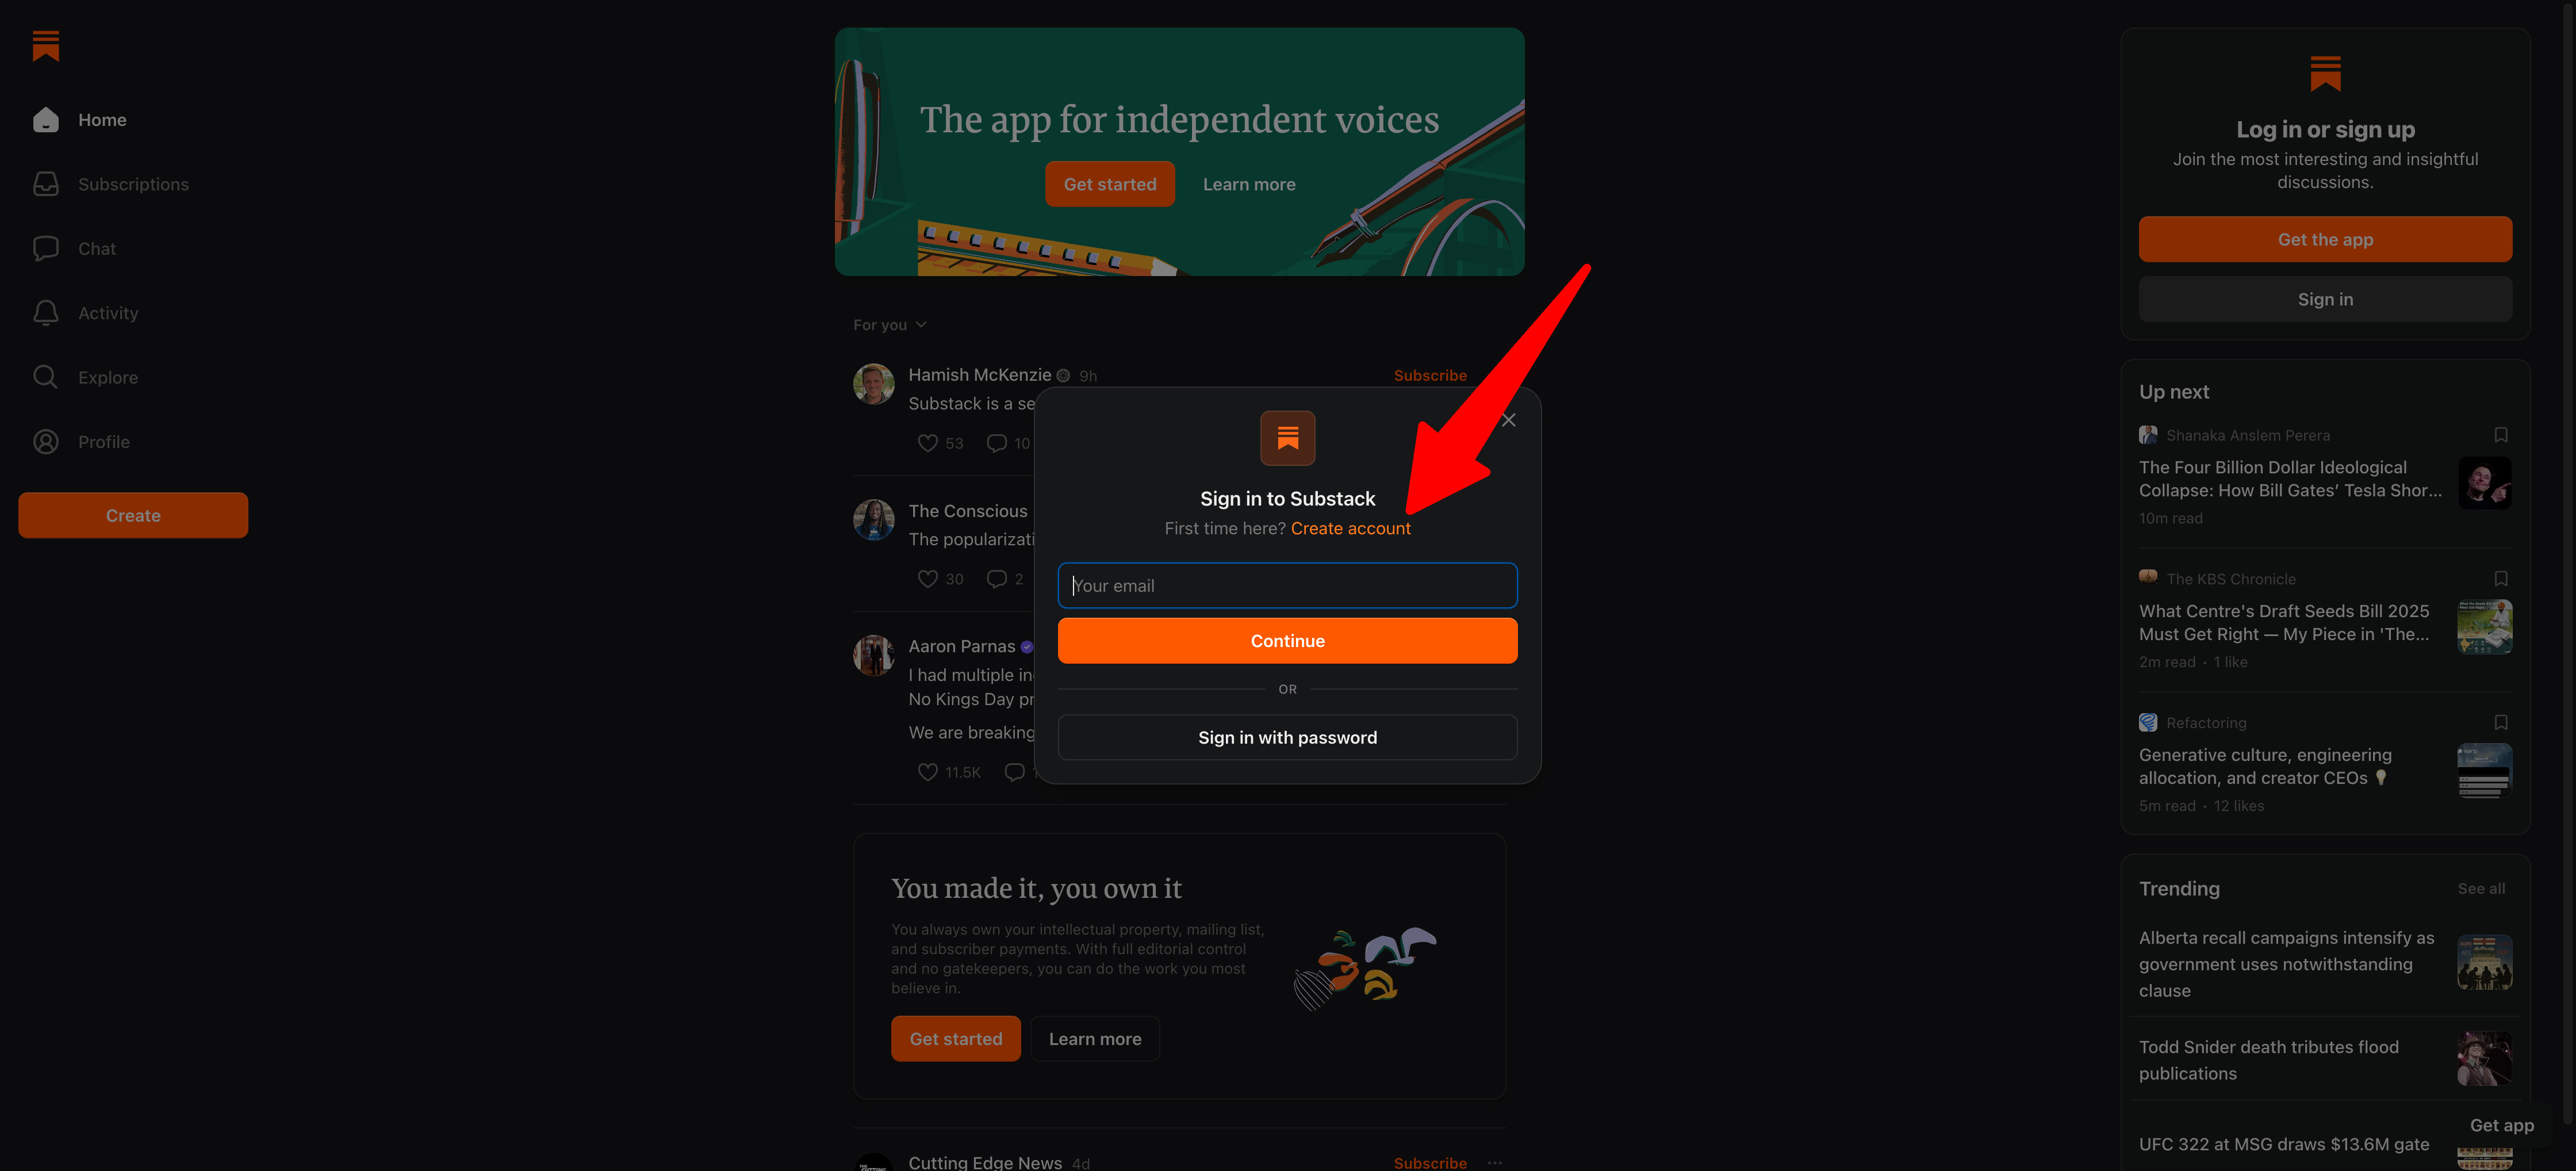
Click “Create account” instead.
4. Choose your interests
Substack asks you to select your interests first.
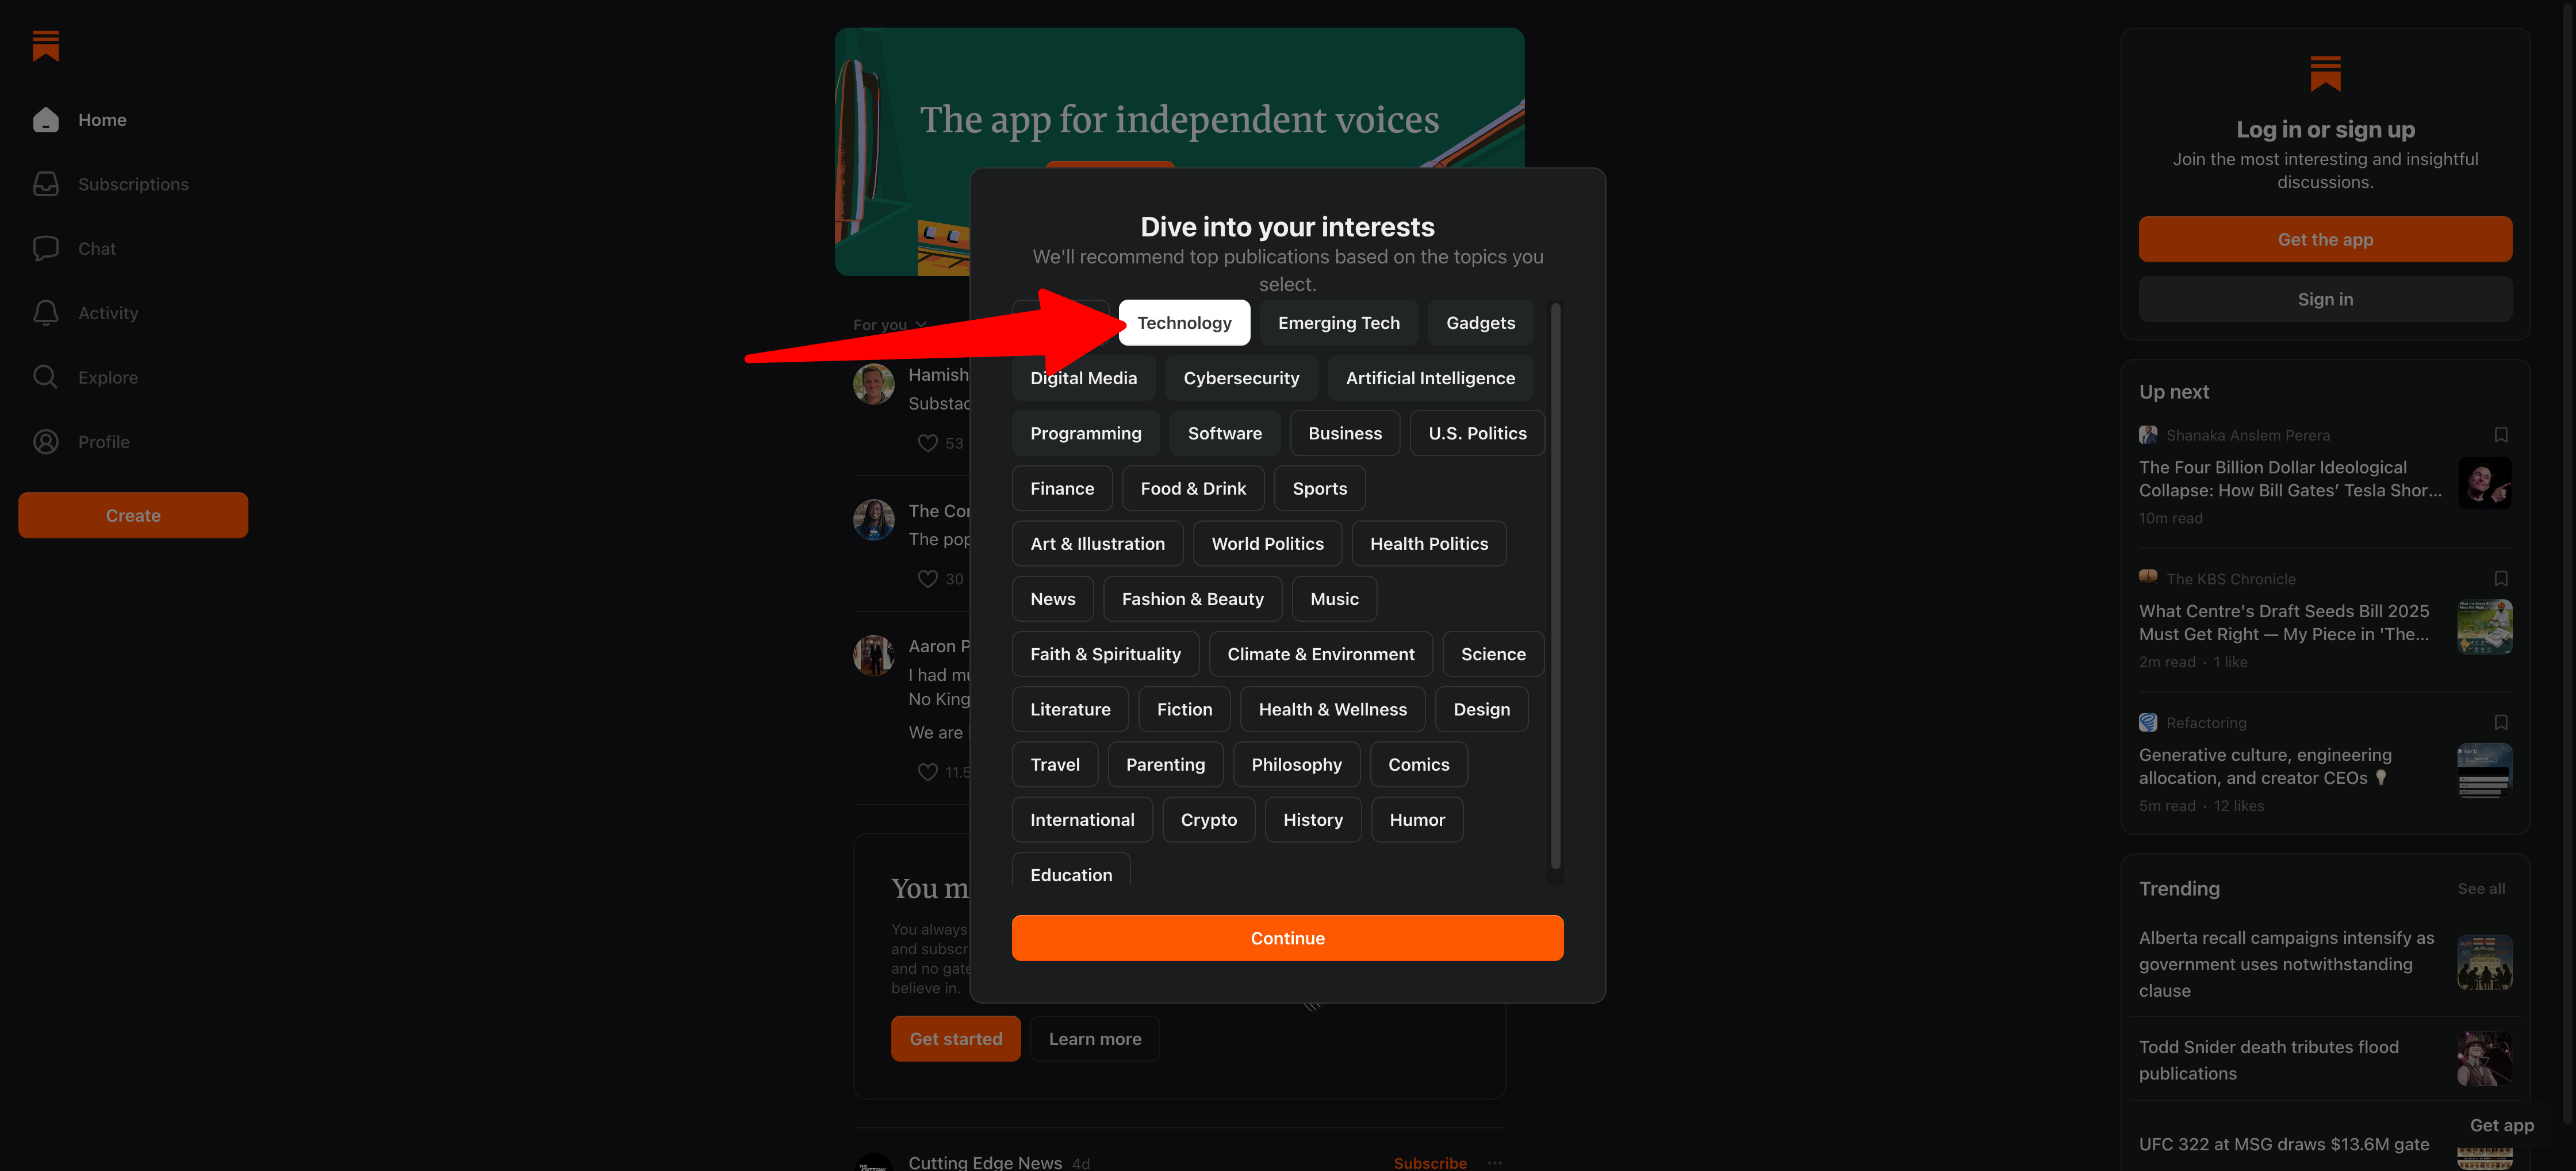
Choose your main interest category (like Technology, Business, Politics, Culture, etc.).
Then, select sub-categories under that main interest.
For example:
Main interest: Technology
Sub-categories: AI, Startups, Crypto, Web Development
Pick the categories that match what you plan to write about.
If you don’t see your exact topic, choose the closest options. This helps Substack show your blog in relevant categories and recommend it to the right readers.
Click “Continue” after selecting your interests.
5. Subscribe to creators (optional)
Substack suggests some creators based on your selected interests.
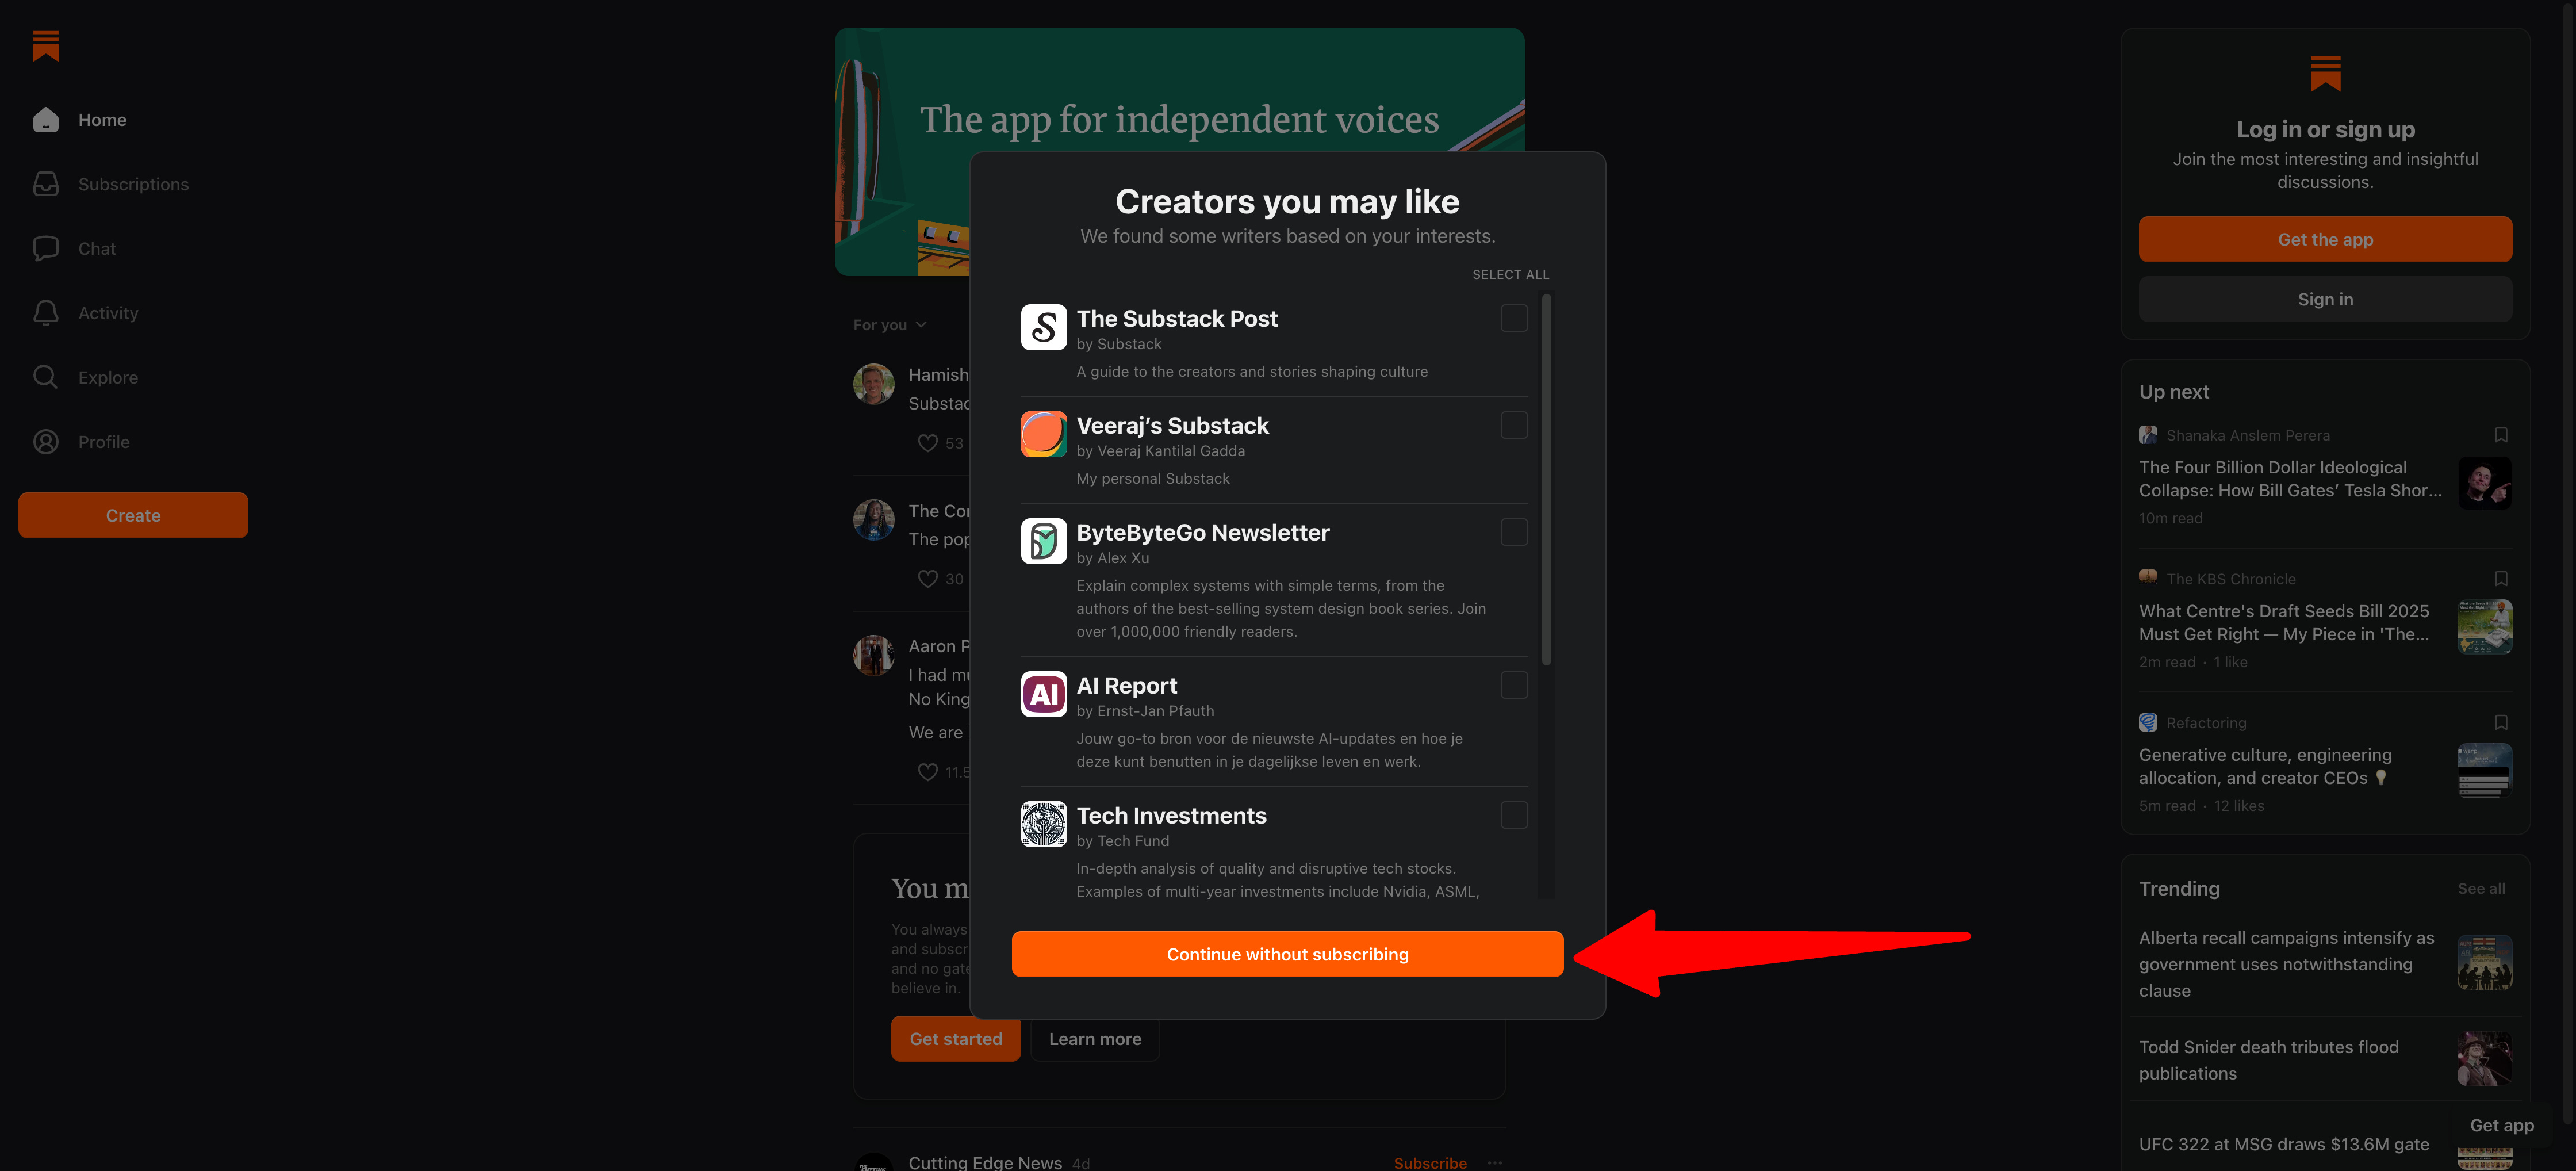
You can subscribe to a few if you want, or click “Continue without subscribing.”
6. Enter your email and create password
Now Substack asks you to enter your email address.

Check the box to agree to their Terms of Use and Privacy Policy.
Click “Get Started”.
7. Set up your profile
Next, add your profile details:
Profile image (optional, but recommended)
Your name
Your handle (this becomes yourhandle.substack.com)
Your bio (optional)
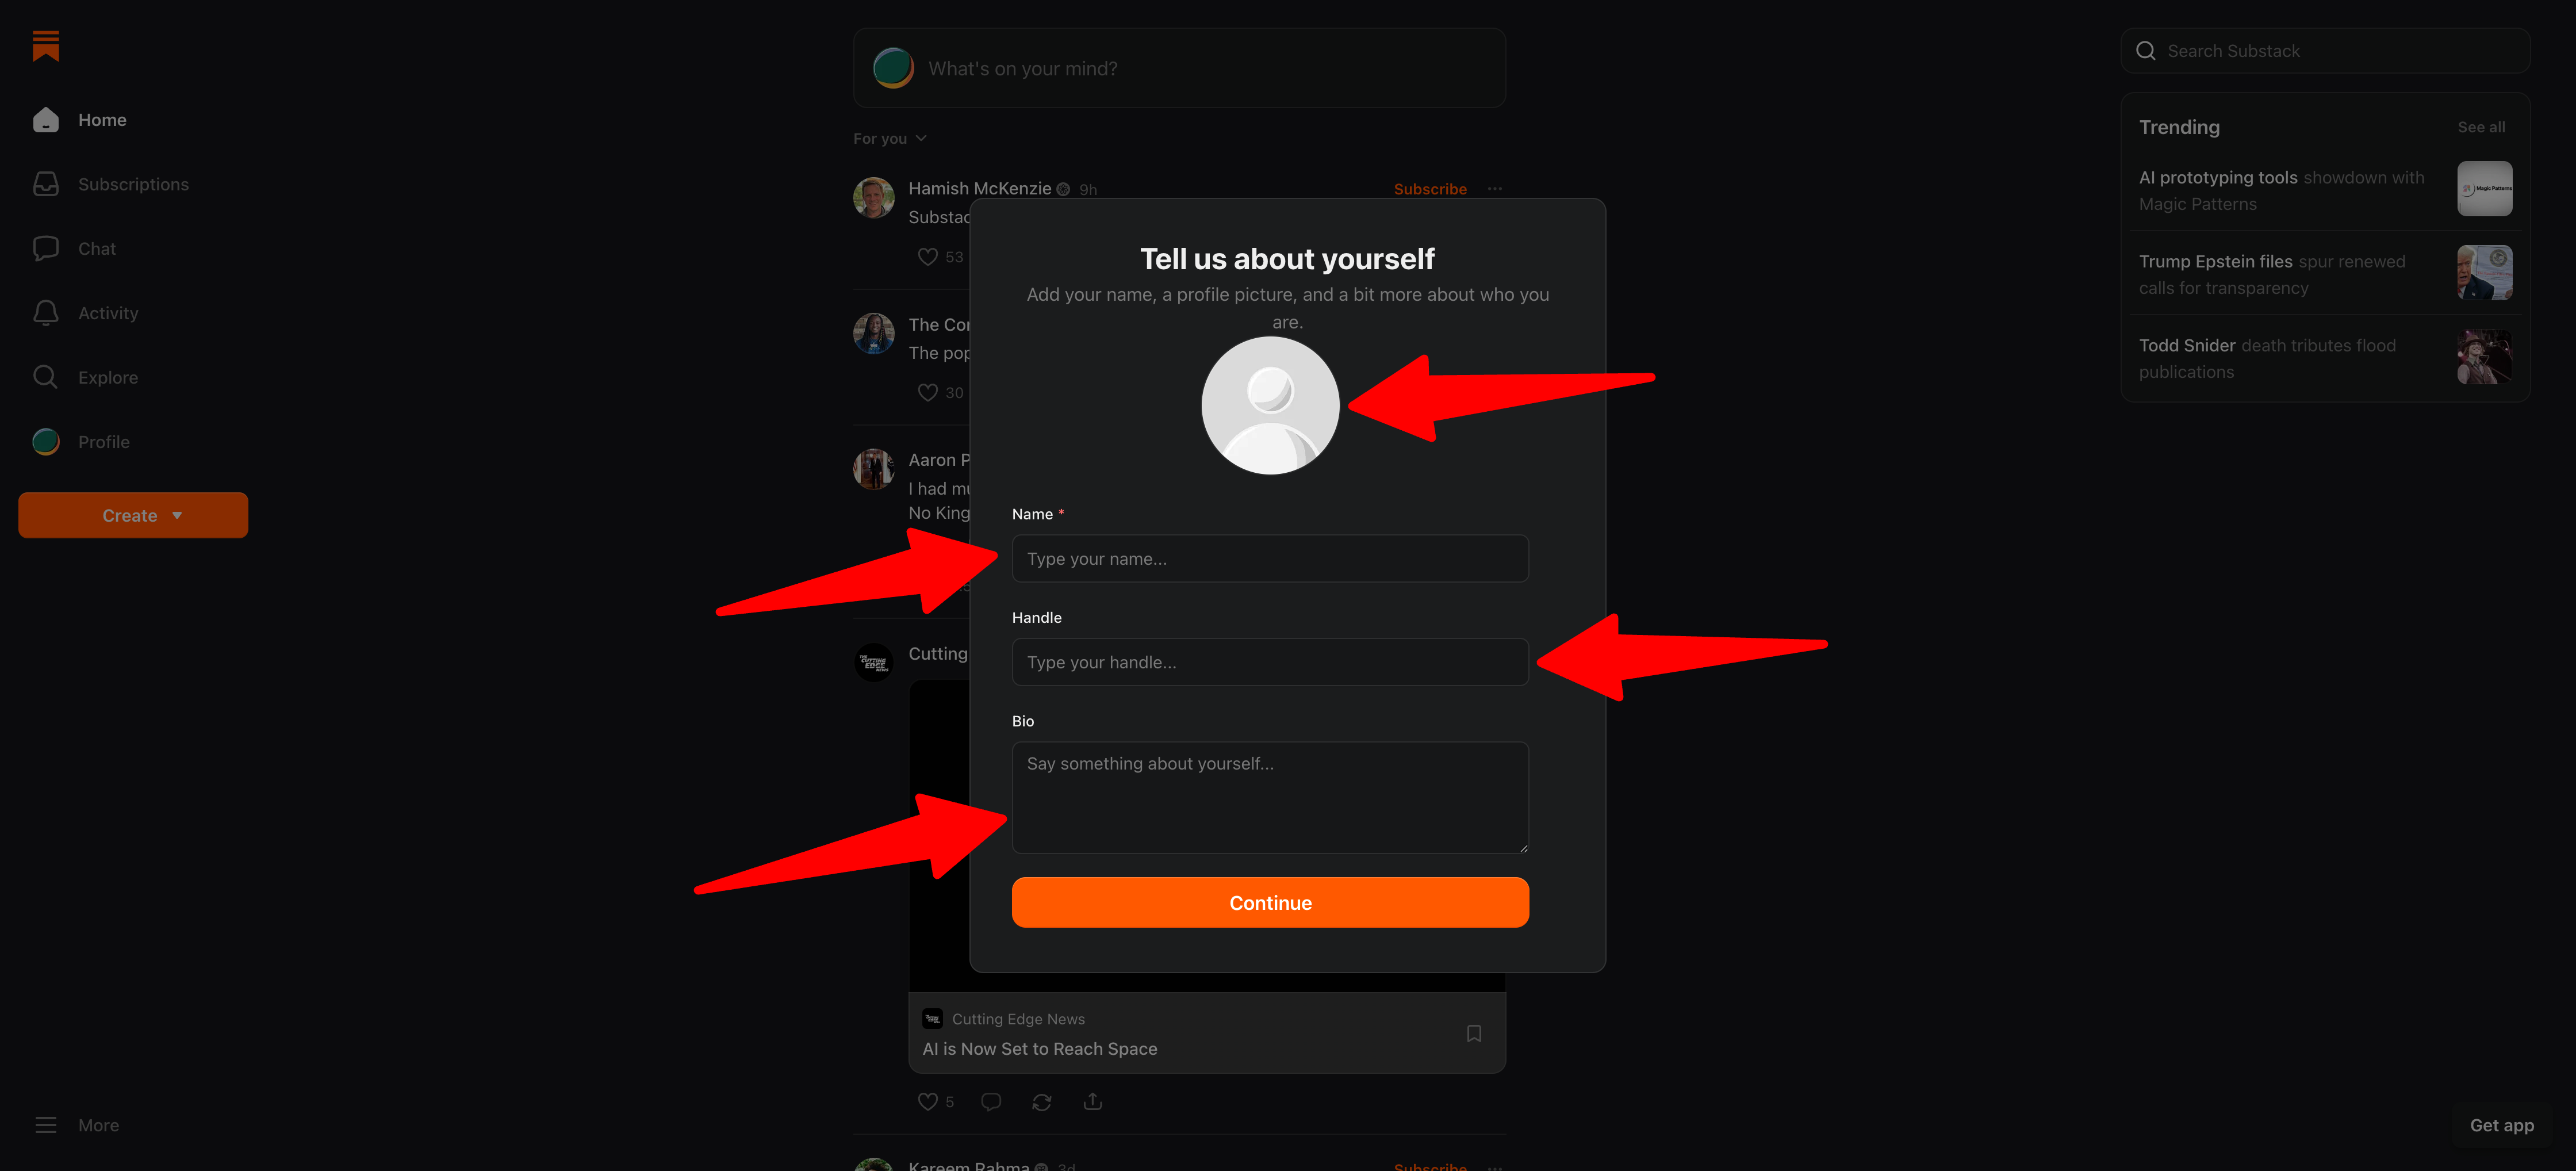
Your handle is important. Keep it short. Use lowercase letters. No spaces.
This creates your temporary Substack URL: yourhandle.substack.com
Once you connect your custom domain, people will use that instead. But your handle stays in your account, so pick something you can live with.
Your publication name can match your domain name or be different.
Examples:
Domain: johnsmith.com, Publication: “John Smith”
Domain: marketingnotes.com, Publication: “Marketing Notes”
Domain: dailydesign.co, Publication: “Daily Design Brief”
You can change this anytime. Don’t stress about perfection.
8. Mobile app prompt
Substack will ask you to download their mobile app.
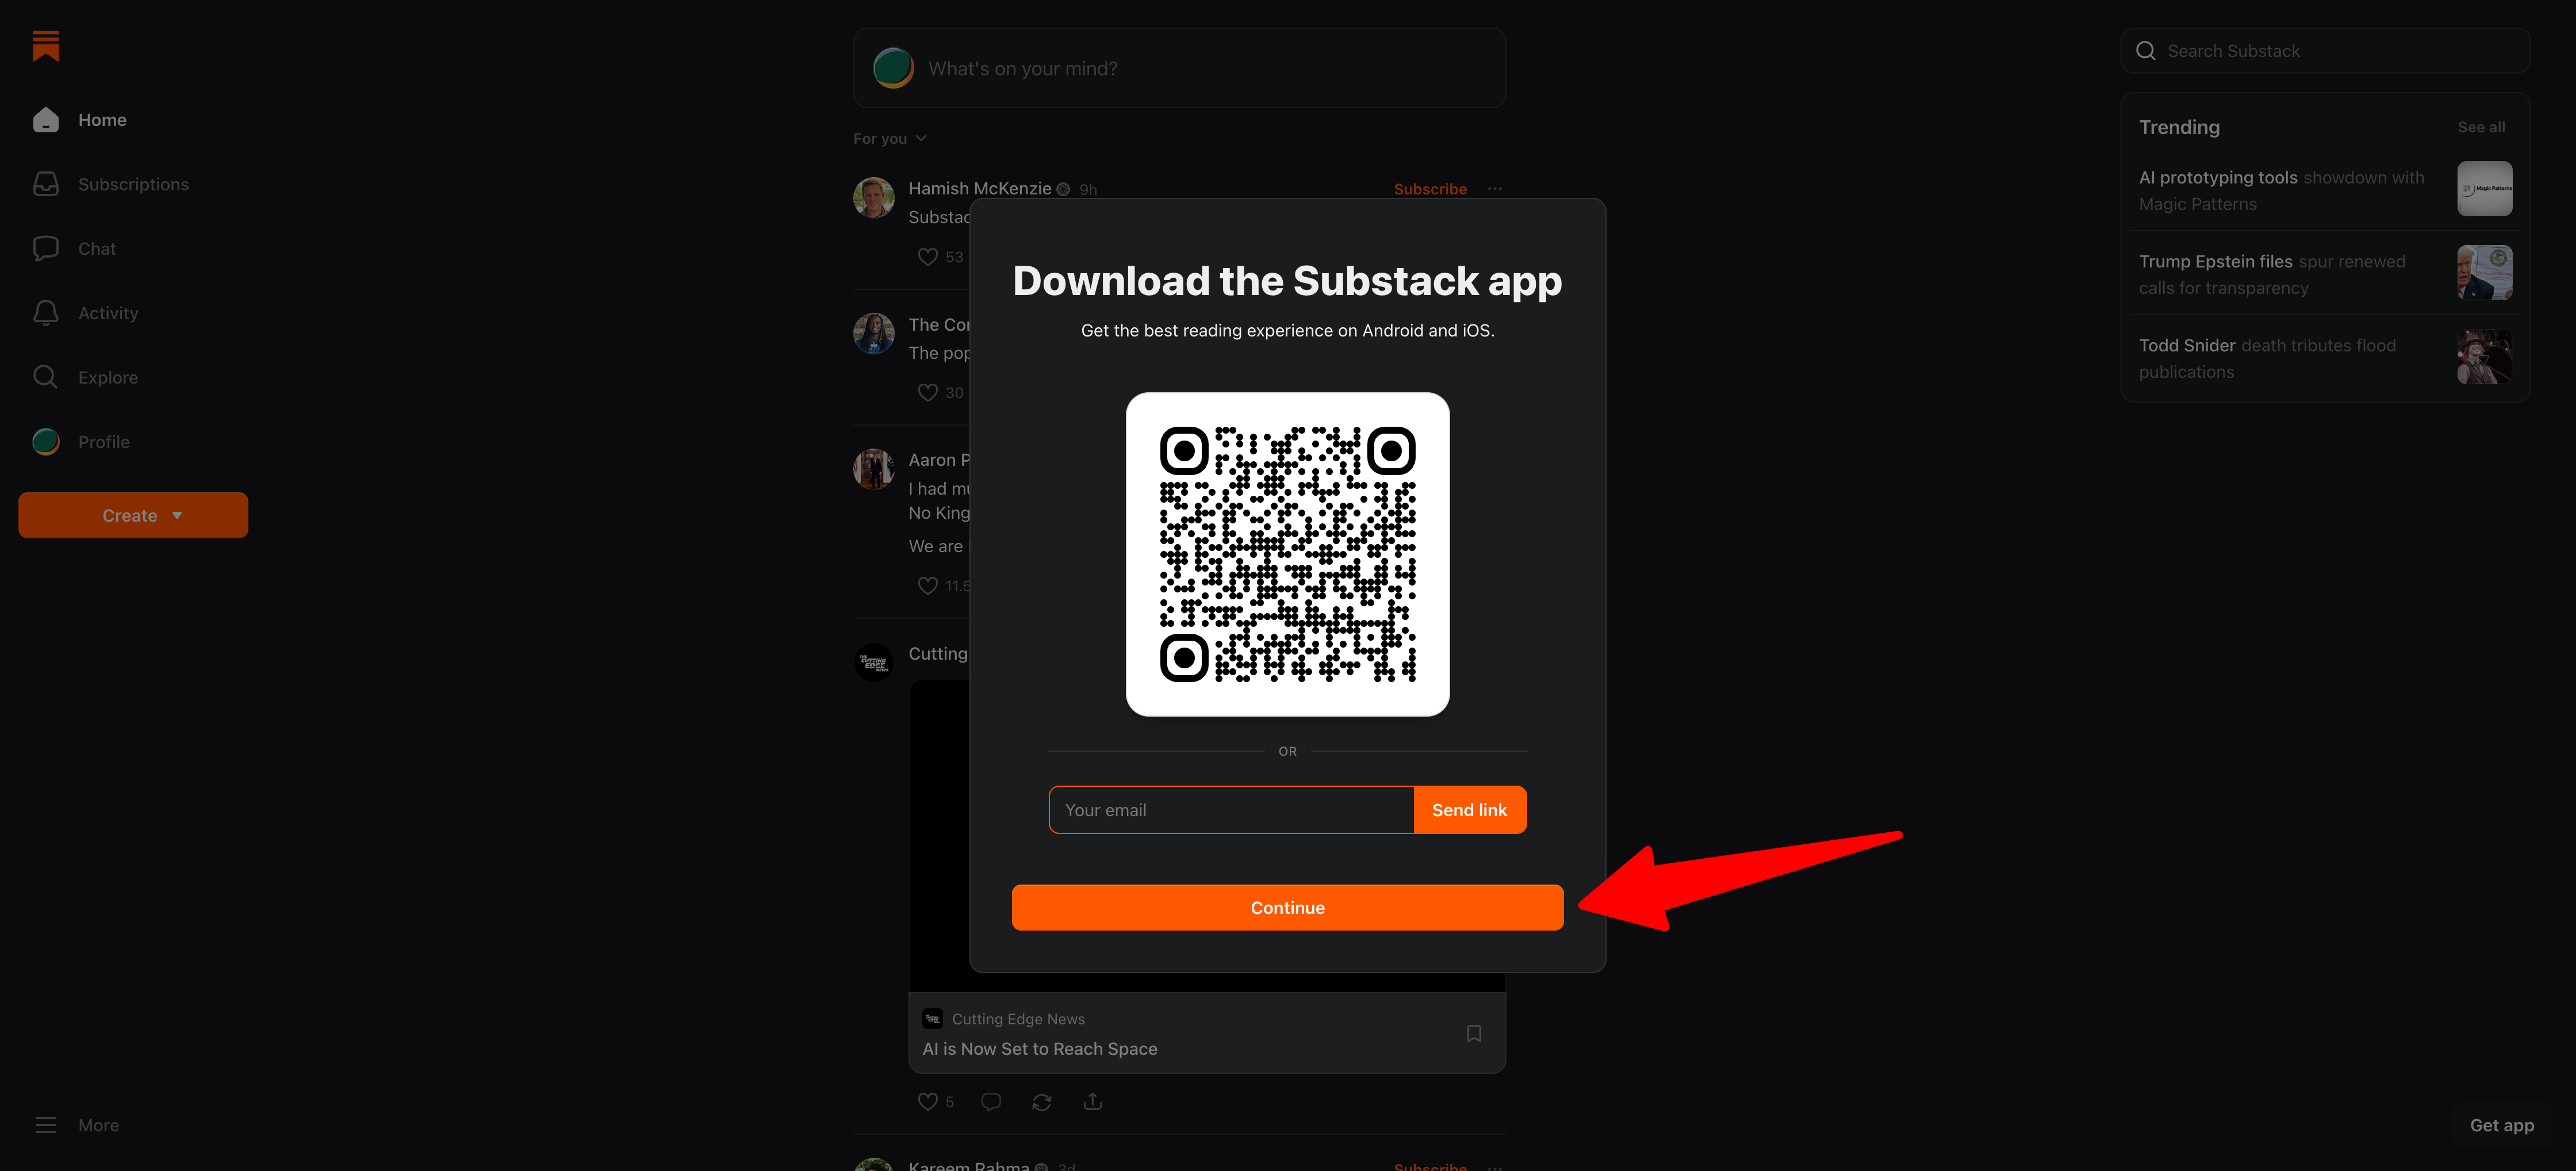
You can download it if you want, or skip this step.
The app isn’t required. You can manage everything from your browser.
9. Go to your profile
After skipping the app download, you’ll be redirected to the Substack homepage.
Click on your profile icon on the left side of the screen.
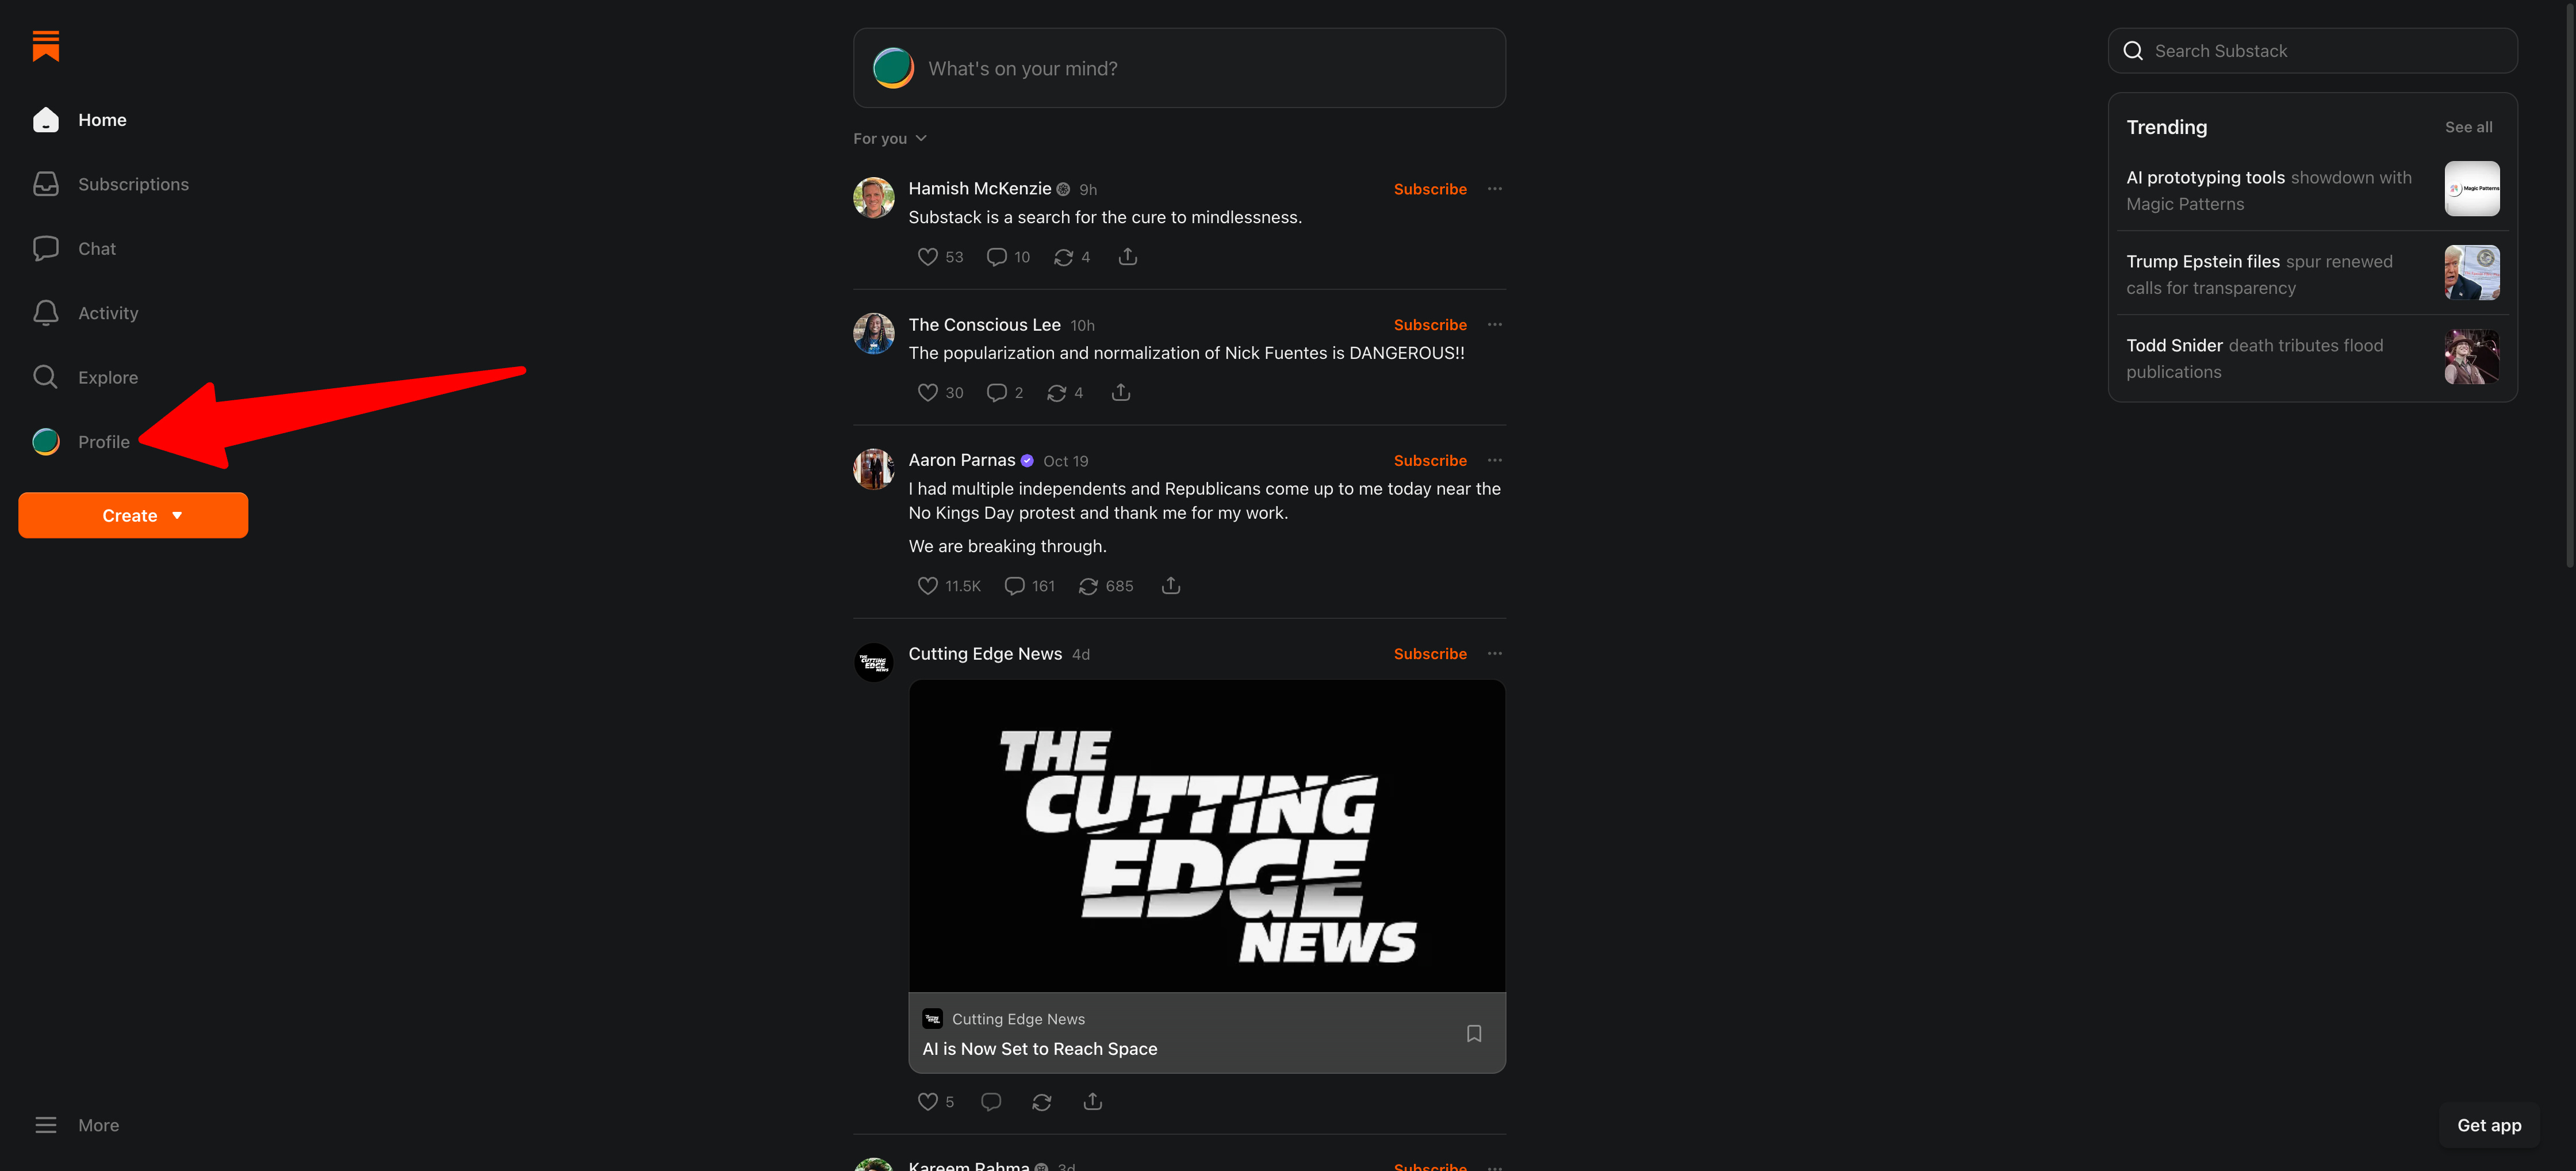
This takes you to your profile page.
10. Edit your profile details
Click “Edit profile” on your profile page.
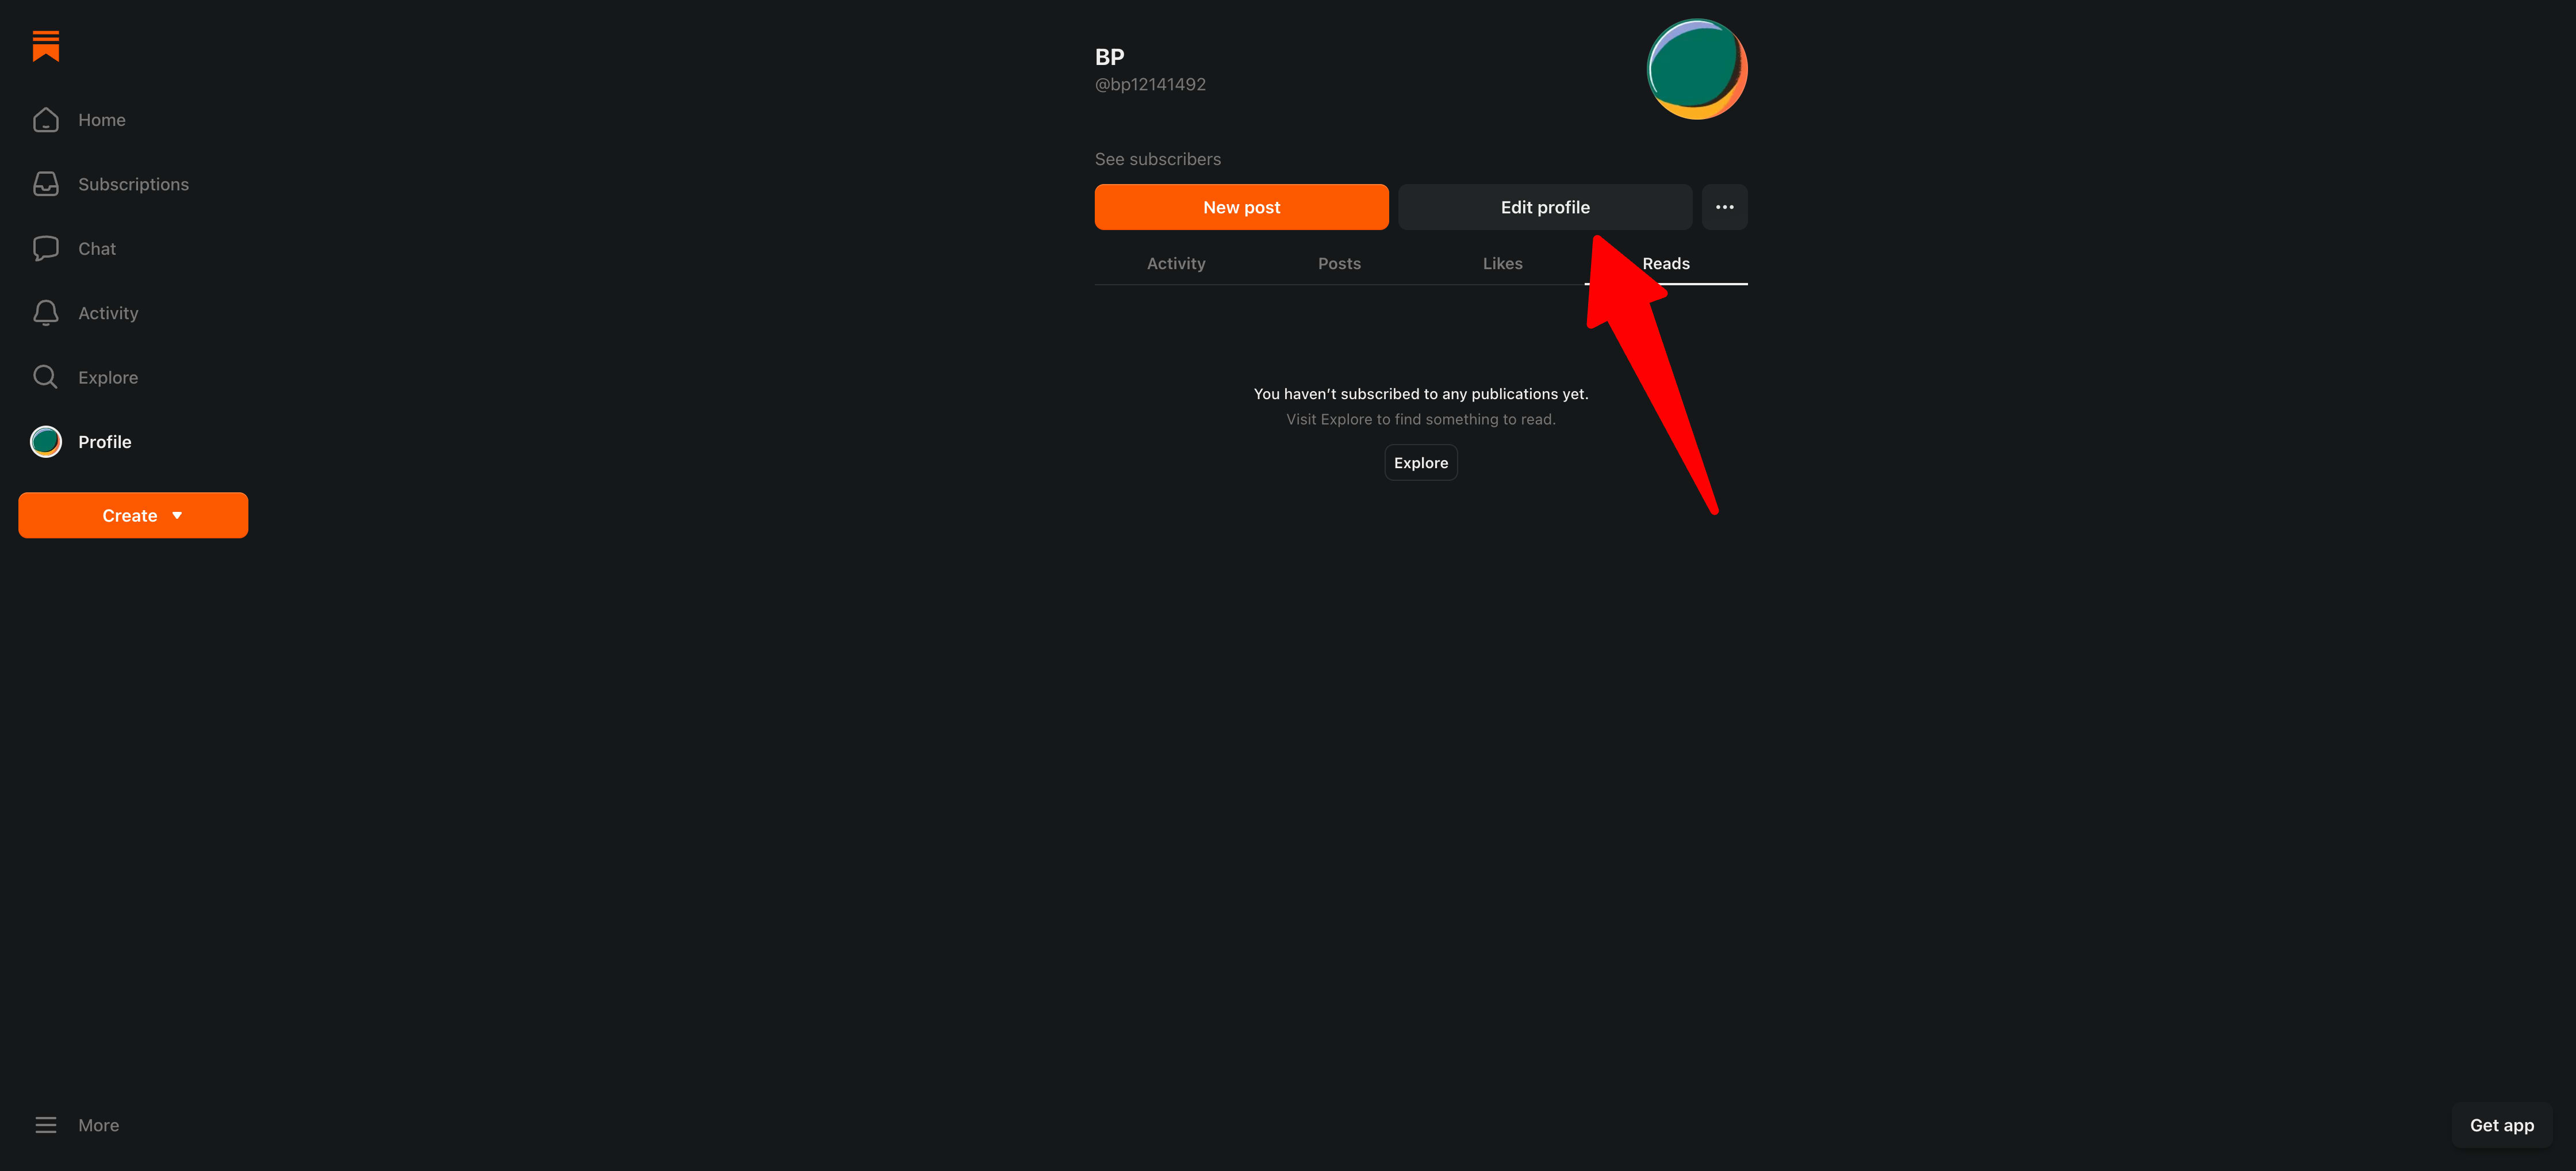
Here you can add more details about yourself:
Update your bio (write a short description of who you are and what you write about)
Add social profile links (Twitter, LinkedIn, website, etc.)
Adjust your profile image if needed
Update your publication name if you want to change it
Fill in what feels relevant. You can always come back and update this later.
Click “Save” when you’re done.
Your publication is live
Once you complete signup, your Substack blog exists.
You can already publish posts to yourhandle.substack.com
But hold off on publishing for now. Let’s connect your custom domain first so everything launches together.
Initial settings you can skip
Substack offers design customization options:
Logo upload
Color scheme
Font choices
Header image
Skip all of it for now.
The default design is clean and works well. You can tweak colors and add a logo later after you publish your first few posts.
Don’t let design delay your launch.
What your dashboard shows
After signup, you see your Substack dashboard.
Key sections:
Posts: Where you write and manage your content
Subscribers: Your email list (empty for now)
Stats: Analytics on views, opens, and clicks (no data yet)
Settings: Where you’ll configure your custom domain in the next step
Poke around if you want. Get familiar with the interface.
But don’t spend an hour tweaking settings. We have more setup to do.
Setting up your About page
Before we connect your domain, write a quick About page.
Click “Settings” then “Publication details” then scroll to “About page.”
Three sentences are enough:
Who you are
What you write about
Why someone should subscribe
Example:
“I’m Sarah Chen, a product designer in Seattle. I write about design systems, remote work, and building better software. Subscribe to get one post every Tuesday morning.”
That’s it. Save it.
Your About page will be live at yourdomain.com/about once we connect your domain.
Common questions at this stage
“Can I change my publication name later?”
Yes. Go to Settings > Publication details > Publication name. Change it anytime.
“What if I pick the wrong handle?”
Your handle is harder to change because it’s tied to your account structure. Pick something you can live with.
Once your custom domain is connected, readers won’t see your handle anyway.
“Should I write my first post now?”
Not yet. Connect your custom domain first. Then write and publish.
That way your first post goes live with your proper domain, not the temporary yourhandle.substack.com URL.
“Do I need to invite subscribers before I publish?”
No. Start with zero subscribers. Publish your first few posts. Then invite people.
Next step
You have a domain. You have a Substack account.
Now let’s unlock the custom domain feature so you can connect the two.
Step 3: Unlock custom domains on Substack
Substack custom domains require a one-time payment to unlock.
This is the $50 fee we mentioned earlier.
The one-time fee
Substack charges $50 to enable custom domain functionality for your publication.
You pay once. The feature unlocks forever.
What the $50 gets you
After you pay:
You can add your custom domain to your Substack
You can swap domains later at no extra cost
SSL certificates are automatically generated and renewed
DNS routing is handled by Substack’s infrastructure
Technical support if something breaks during setup
This is not a recurring charge. Pay once, keep the feature forever.
When to pay this fee
You can unlock custom domains before or after you buy your domain name.
Most people buy their domain first, then unlock Substack’s custom domain feature, then connect the two.
That’s the order we’re following in this guide.
How to unlock custom domains
Here’s the step-by-step process.
1. Go to your Substack dashboard
Log into your Substack account if you’re not already logged in.
2. Open Settings
Click “Settings” in the left sidebar.
3. Go to Domain settings
In the Settings menu, click “Domain” in the left navigation.
4. Click “Add custom domain”
You’ll see a button that says “Add custom domain” or “Unlock custom domains.”
Click it.
5. Review the pricing
Substack shows you the $50 one-time fee.
Read the description to confirm what you’re paying for.
6. Enter payment details
Add your credit card information.
Substack uses Stripe for payment processing, which is secure and standard.
7. Complete the payment
Click “Pay” or “Unlock custom domains.”
The charge processes immediately.
8. Feature unlocked
Once payment completes, the custom domain feature is active on your account.
You’ll now see a field to enter your domain name.
What happens after you pay
You get immediate access to the domain configuration screen.
This is where you’ll enter your custom domain in the next step.
Substack doesn’t send a separate confirmation email for this payment. It just unlocks the feature in your dashboard.
If you need a receipt, check your email for the Stripe payment confirmation.
Is the $50 refundable?
No. This is a non-refundable fee.
Once you unlock custom domains, you can’t undo the payment.
Make sure you’re committed to using a custom domain before you pay.
If you’re still testing whether blogging is for you, wait. Use the free yourhandle.substack.com URL for a month or two. Upgrade to a custom domain once you’re sure.
Can I use multiple domains with one payment?
One $50 payment covers one Substack publication.
If you start a second blog on Substack, that’s a separate publication. You’d need to pay $50 again to unlock custom domains for the second publication.
But within one publication, you can swap domains freely. No extra charge.
What if I already paid in the past?
If you previously unlocked custom domains on your Substack account, you won’t be charged again.
The feature stays unlocked even if you removed your old domain.
Just go to Settings > Domain and add your new domain.
Common questions at this stage
“Why does Substack charge for this?”
Running custom domain infrastructure costs money. SSL certificates. DNS routing. Support.
The $50 covers those costs and keeps the feature sustainable for Substack.
Other blogging platforms charge monthly fees or require separate hosting. Substack’s one-time fee is relatively affordable.
“Can I split the cost with someone?”
No. Each Substack publication needs its own custom domain unlock.
You can’t share one unlock across multiple publications or accounts.
“What if I decide not to use a custom domain later?”
You keep the feature. You just wouldn’t use it.
Your blog would go back to using yourhandle.substack.com as the URL.
The $50 doesn’t get refunded, but you could always add a custom domain again later at no extra cost.
“Is this worth it?”
If you’re serious about building an audience and want to own your web presence, yes.
$50 one-time is less than three months of basic hosting on most platforms.
If you’re just testing whether you like blogging, start free and upgrade later.
Next step
The custom domain feature is unlocked.
Now let’s connect your domain to your Substack blog.
This is the technical step, but we’ll break it down so it’s simple to follow.
Step 4: Connect your domain to Substack
This is the technical step where you connect your domain to your Substack blog.
It sounds complicated. It’s actually just copying and pasting information between two websites.
Access your Publisher Dashboard
1. Go to your Substack page
Open your browser and go to yourhandle.substack.com (replace “yourhandle” with your actual handle).
2. Click the three dots menu
On your page, you’ll see three dots on the right side of your “Edit Profile” button.
Click those three dots.
3. Select Publisher Dashboard
From the dropdown menu, click “Publisher Dashboard.”
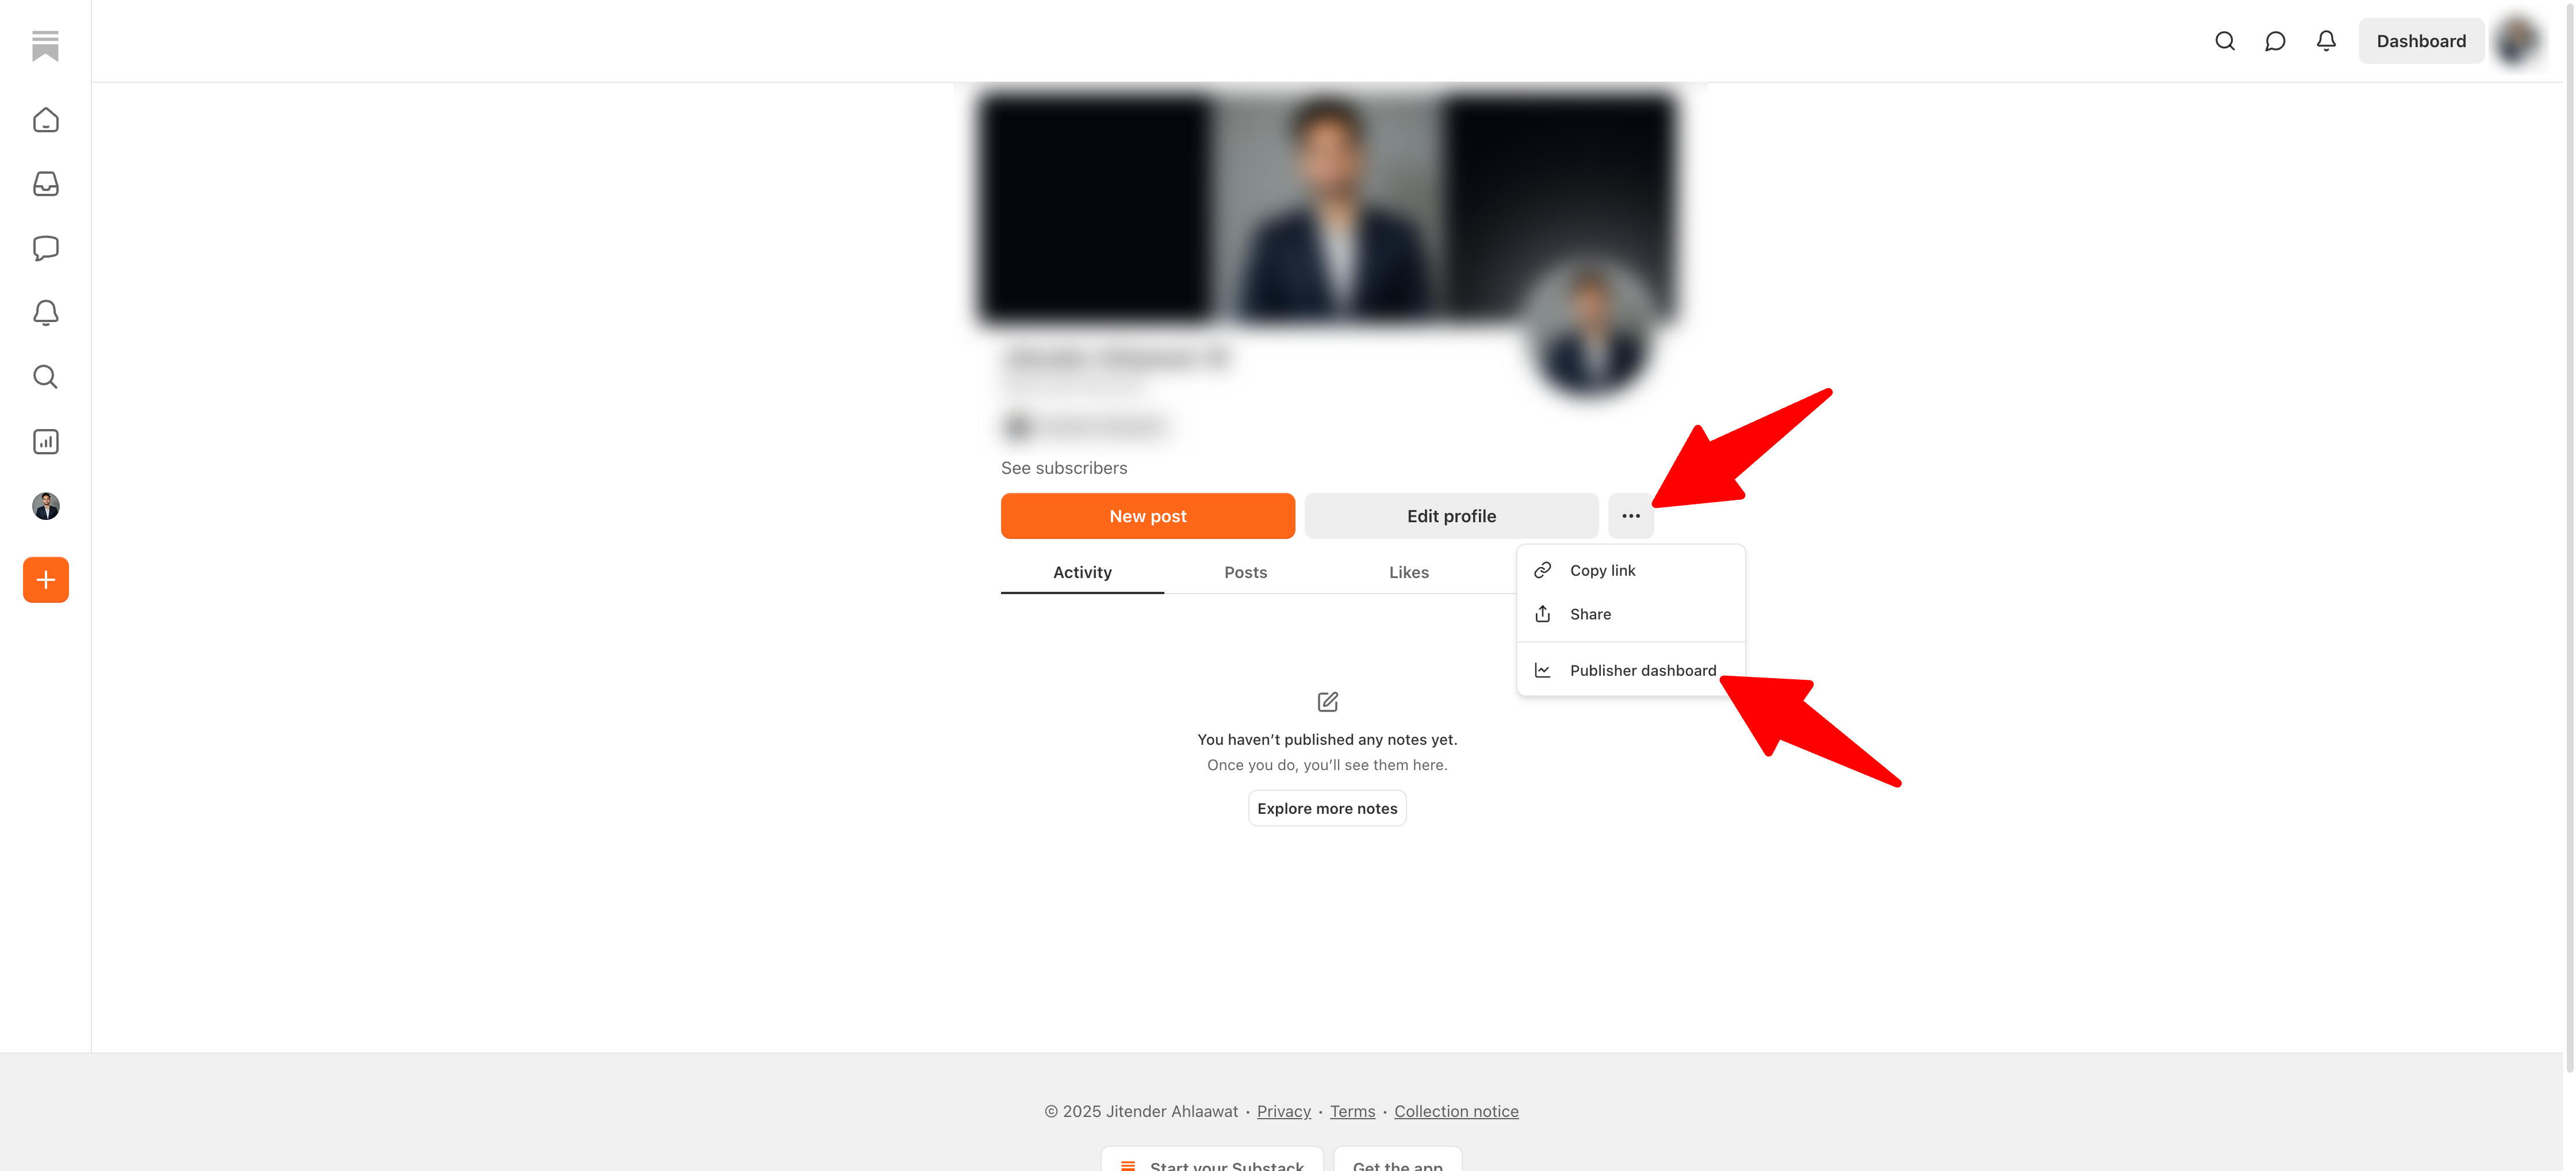
This takes you to your publisher dashboard where you can see stats like subscribers, revenue, and views.
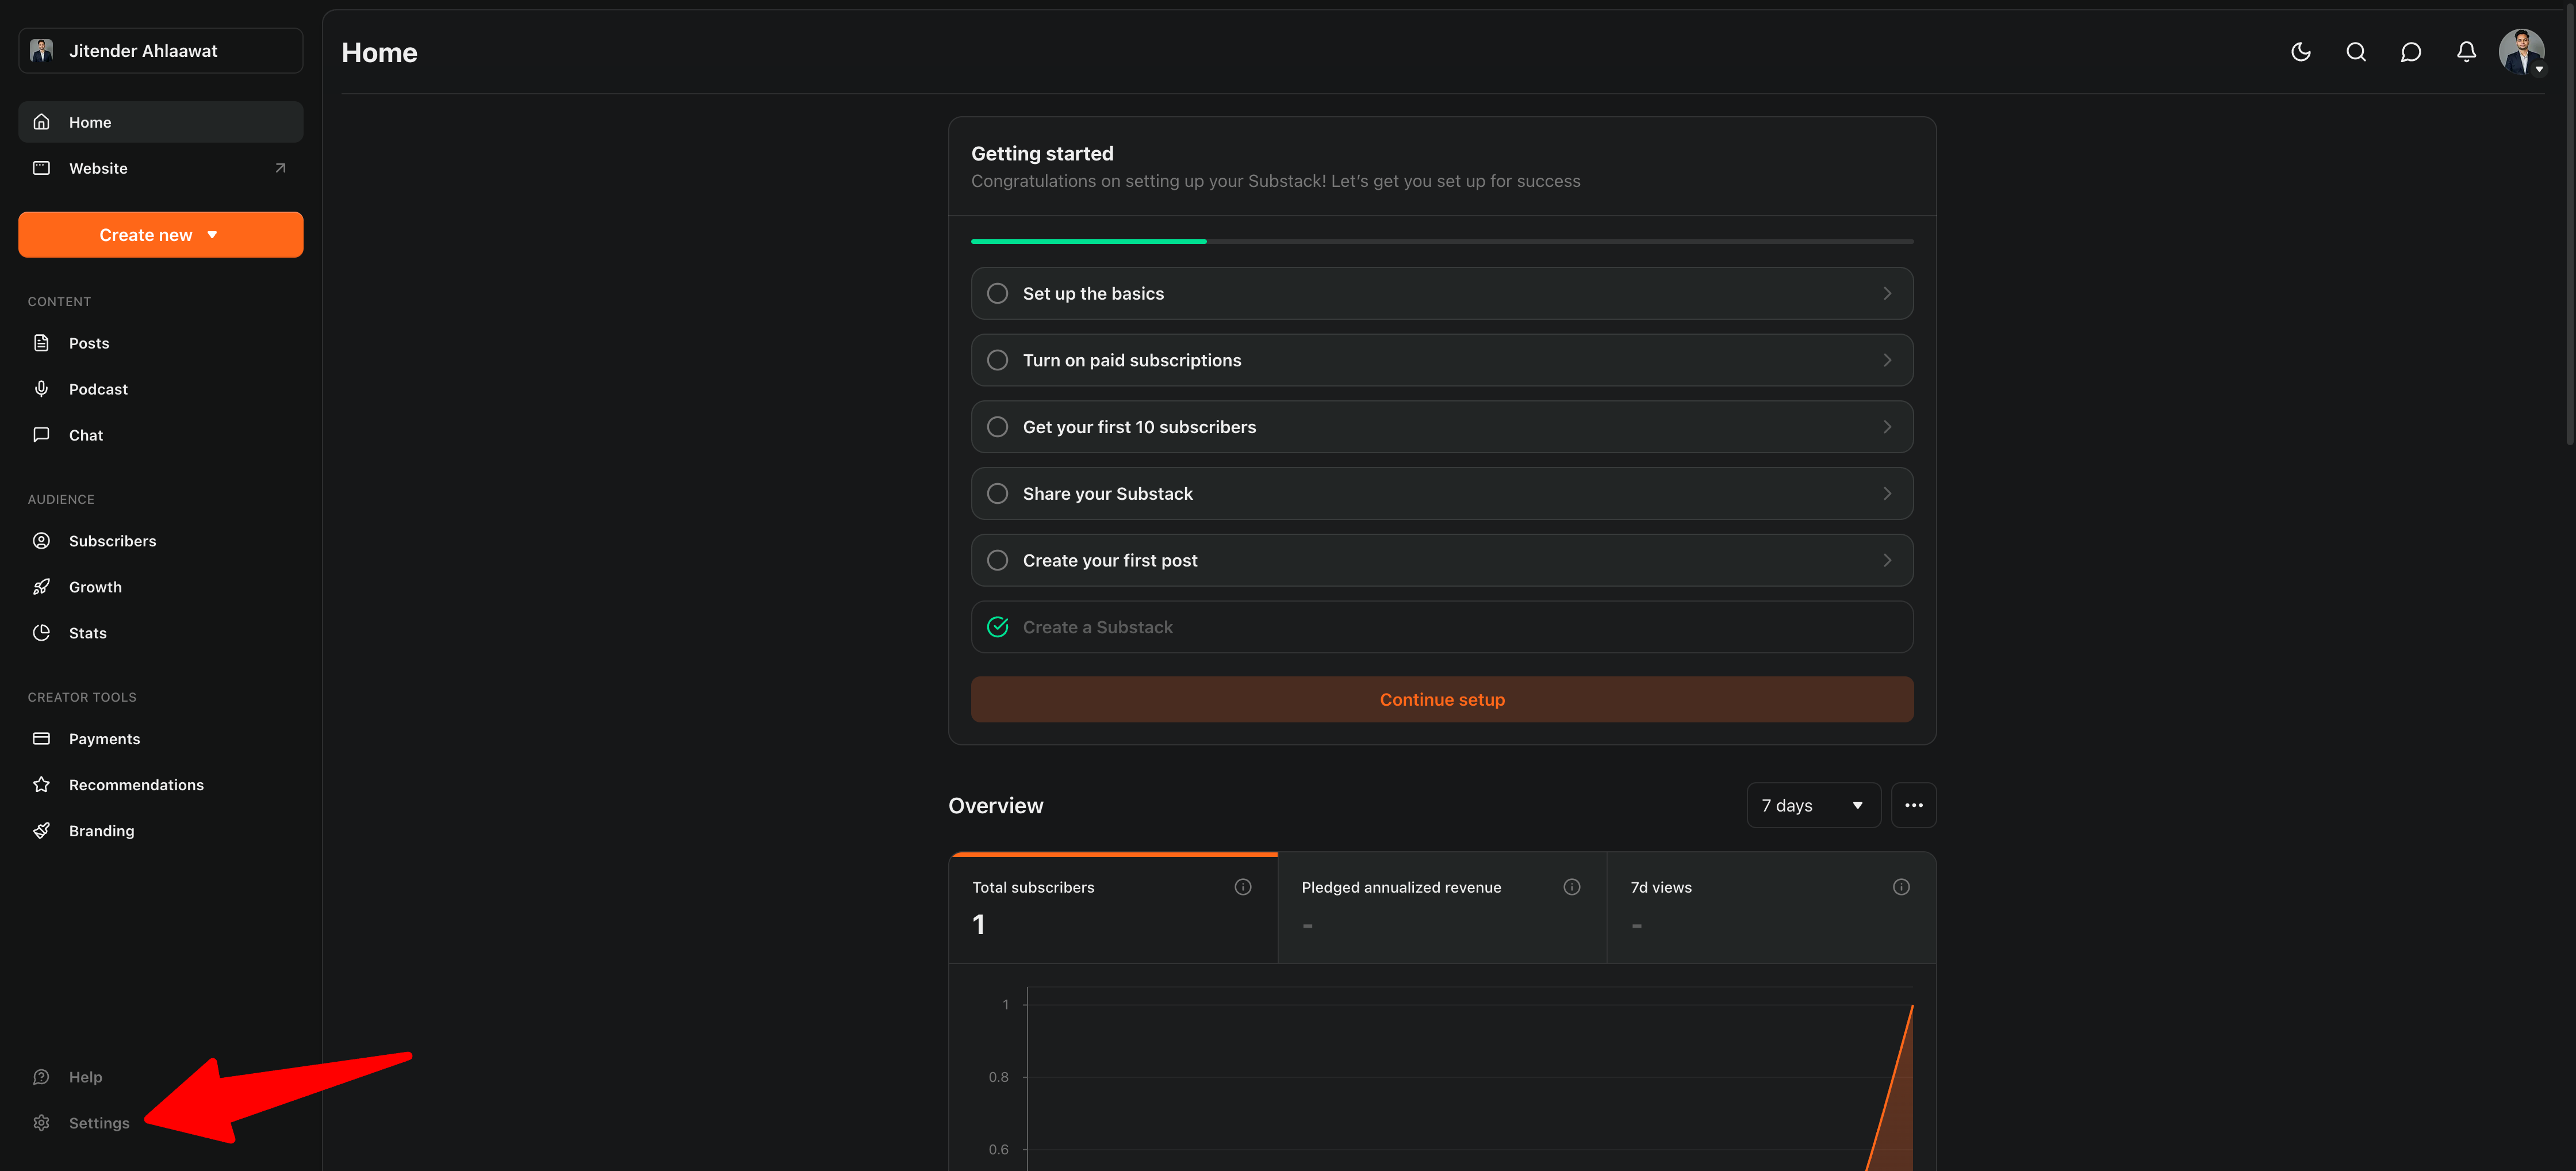
4. Open Settings
In the bottom left corner of your Publisher Dashboard, click “Settings.”
5. Find the Domain option
In the left sidebar, scroll down.
Under the “Advanced” section, you’ll see “Domain.”
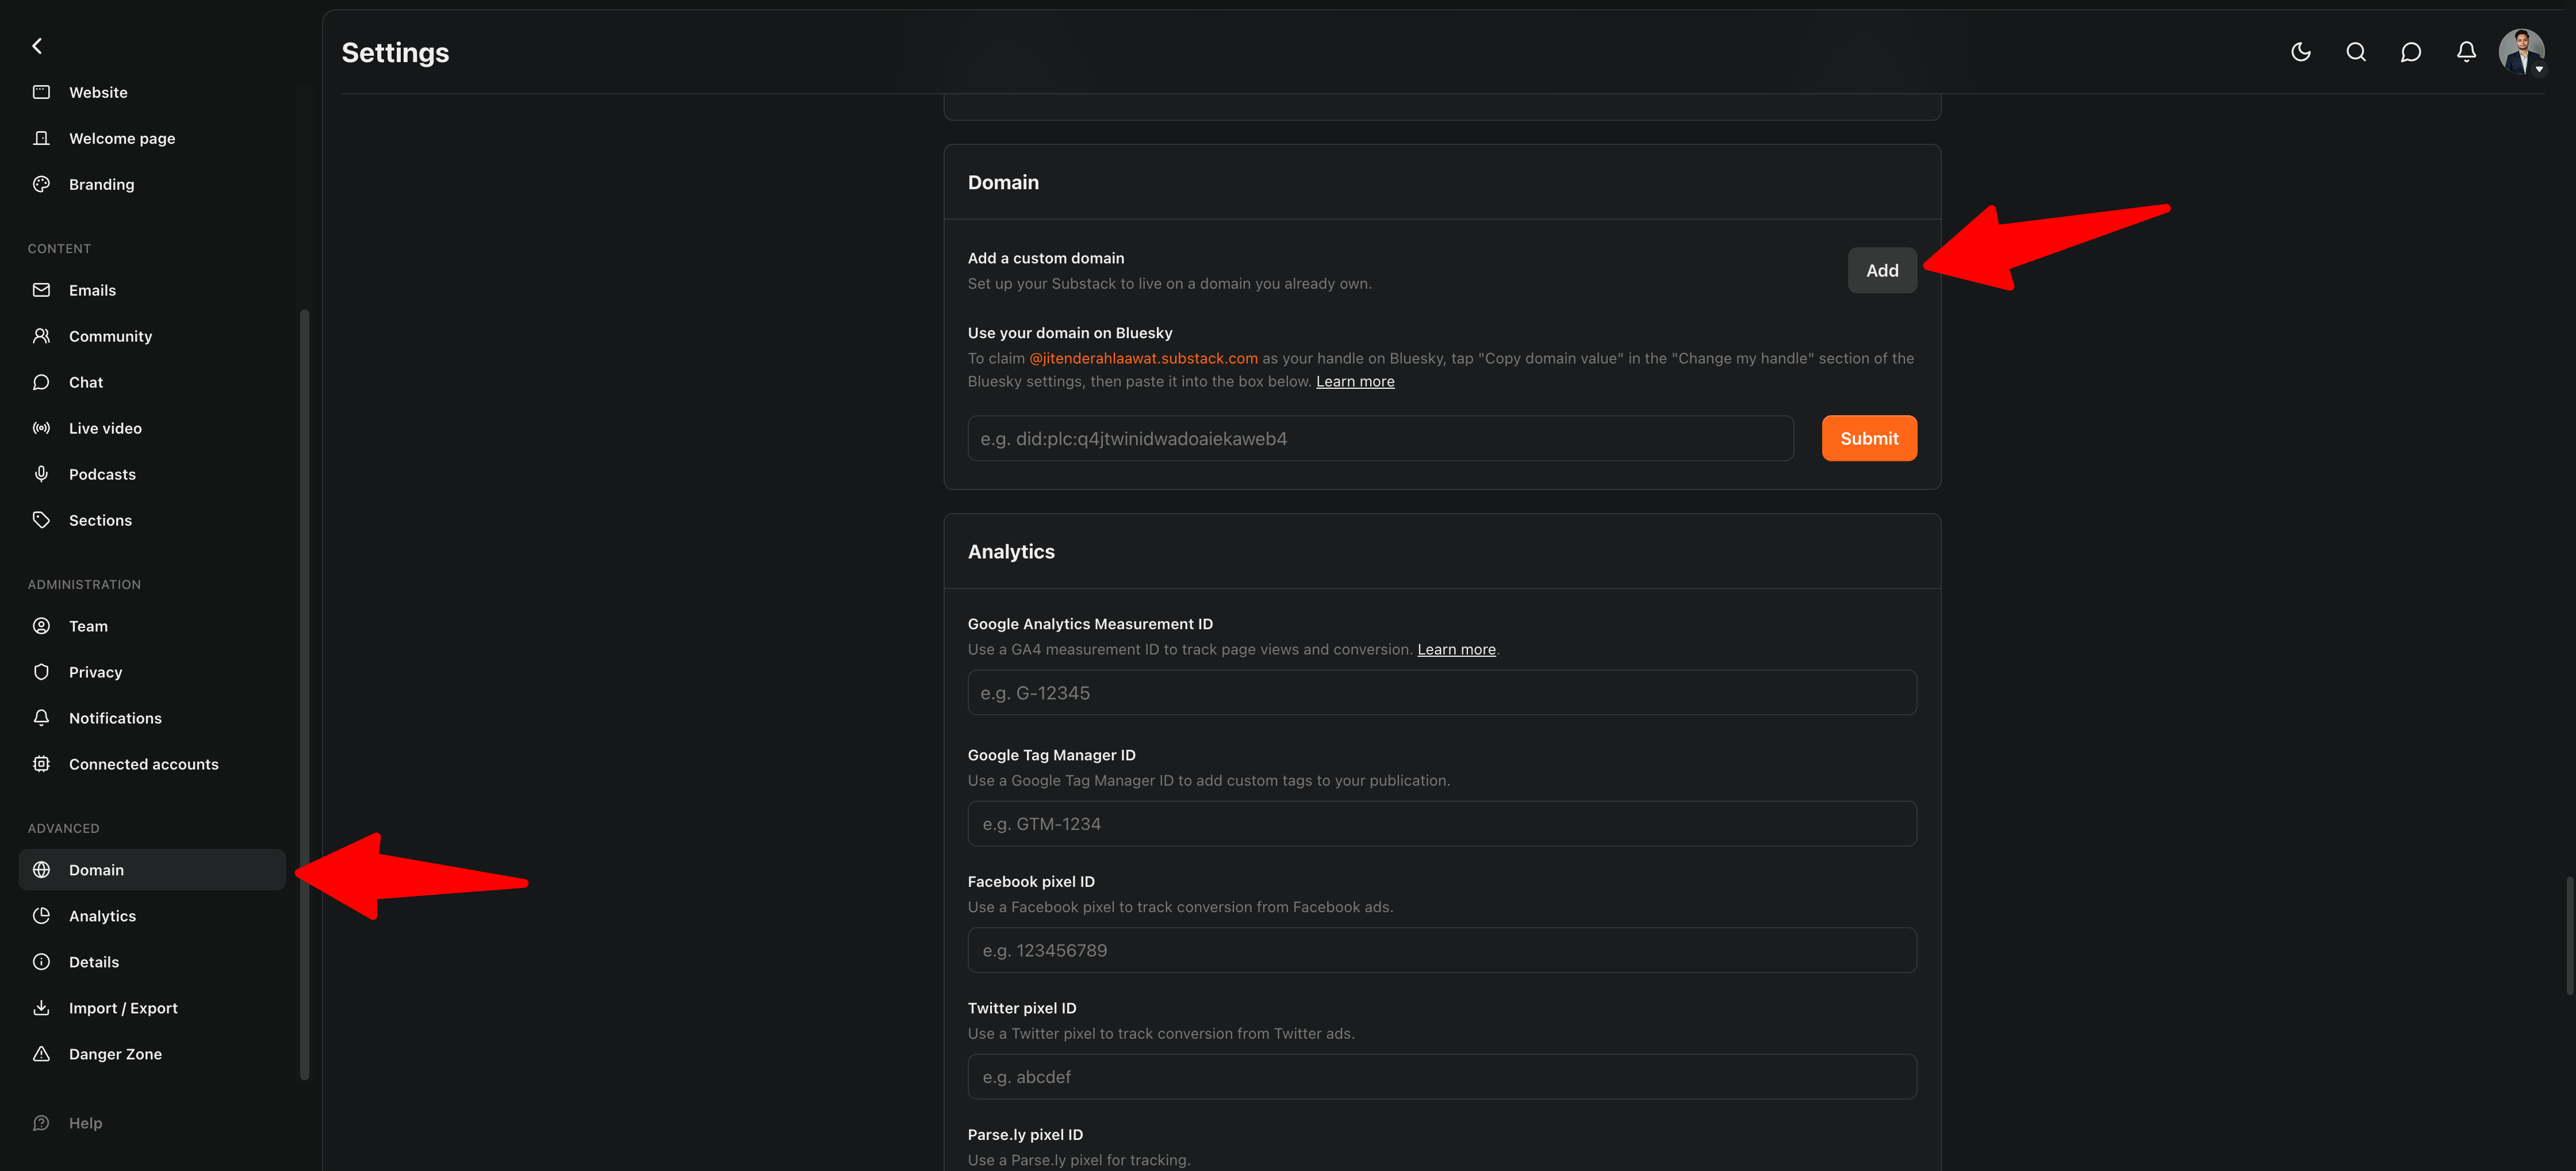
Click on “Domain.”
6. Add custom domain
You’ll see an option to add a custom domain.
Click “Add.”
7. Pay the one-time fee
Substack redirects you to enter your card details.
You’ll be charged a one-time fee of $50 USD.
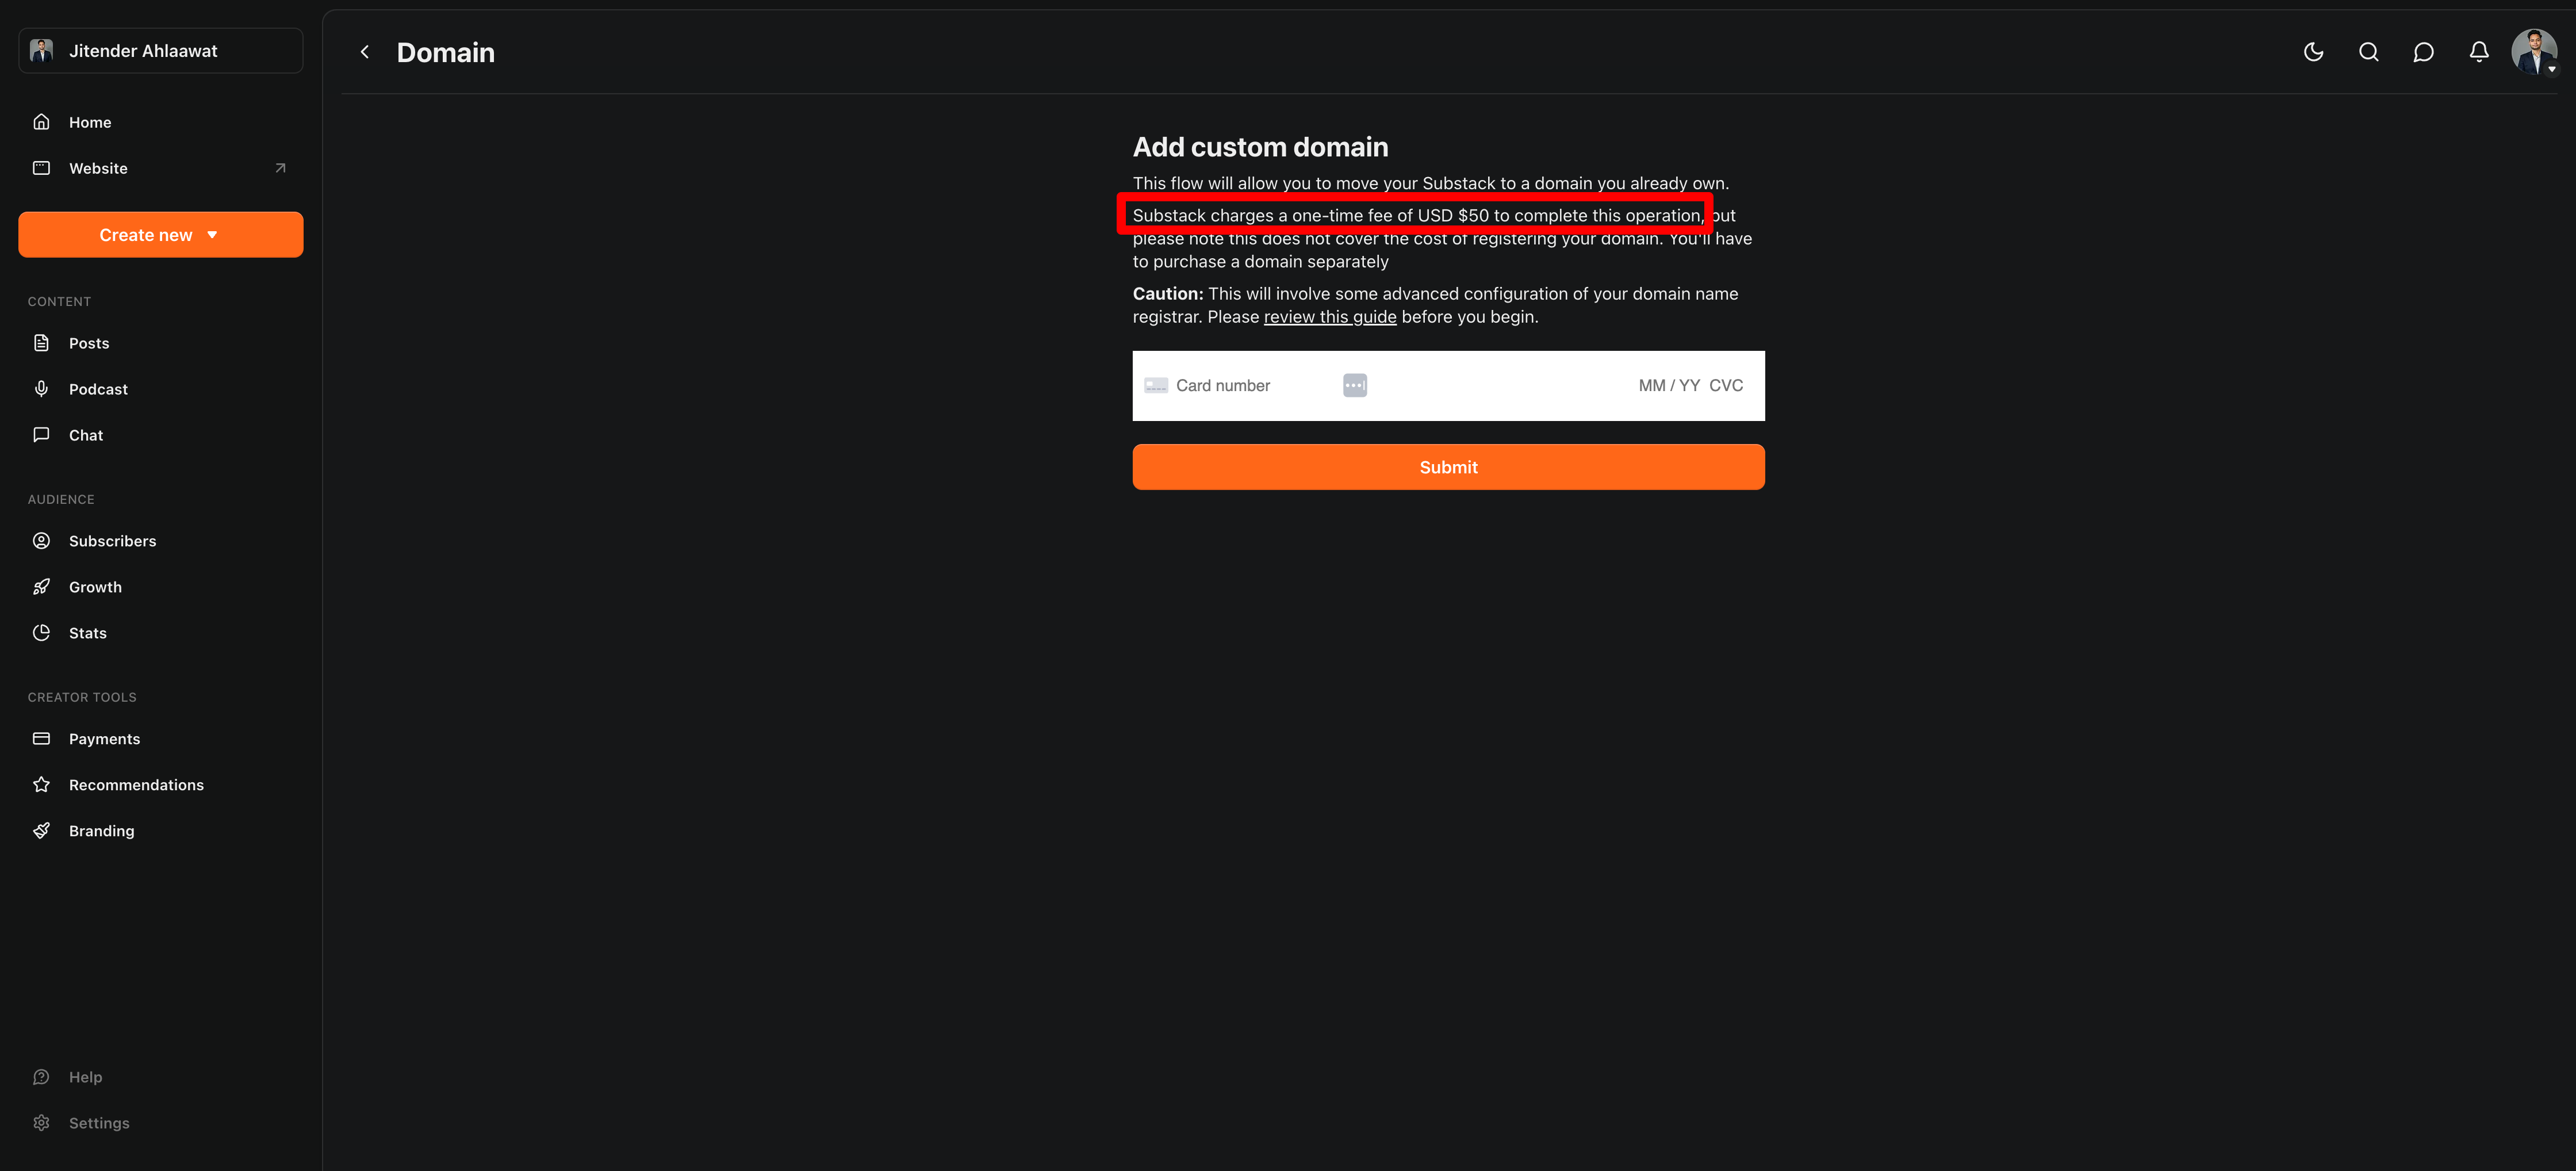
This unlocks the custom domain feature for your publication forever.
Enter your payment information and complete the transaction.
8. Enter your custom domain
After payment, Substack asks you to enter your custom domain.
Type your domain with www at the front: www.yourblog.com
Important: Use the www version. Substack requires it.
9. Check the root domain redirect option
Make sure to enable “Root domain redirects” if Substack shows this option.
This ensures both www.yourblog.com and yourblog.com work.
Click “Continue” or “Next.”
Get your DNS information
10. View your DNS records
Substack now shows you the DNS records you need to add.
You’ll see two pieces of information:
Name (also called Host or Subdomain): Usually “www”
Target (also called Points To or Value): A Substack URL like custom.substack.com
Copy this information. You’ll need it in the next step.
Don’t close this page. Keep it open in one browser tab.
Add DNS records in your domain registrar
11. Open your domain registrar
Open a new browser tab and go to your domain registrar (Namecheap, Porkbun, or wherever you bought your domain).
Log in to your account.
We’ll use Namecheap as the example, but the process is similar everywhere.
On Namecheap:
1. Go to Domain List
Click “Domain List” in the left sidebar.
2. Click Manage
Find your domain in the list and click the “Manage” button next to it.
3. Go to Advanced DNS
Click the “Advanced DNS” tab near the top.
This is where you manage DNS records for your domain.
4. Add a CNAME record
Click “Add New Record” button.
Select “CNAME Record” from the dropdown.
Enter the information from Substack:
Host field: Enter “www”
Value field: Paste the Target URL from Substack (something like custom.substack.com)
TTL field: Leave it as “Automatic” or “30 min”
Click the green checkmark or “Save” button.
5. Add an A record for root domain
Click “Add New Record” again.
Select “A Record” from the dropdown.
Enter these details:
Host field: Enter “@”
Value field: Enter this IP address: 3.231.35.217
TTL field: Leave as “Automatic”
Click save.
This makes yourblog.com (without www) redirect to www.yourblog.com
For other domain registrars
The field names might be different, but the concept is the same:
Porkbun: Go to DNS settings, add CNAME with Host “www” and Answer from Substack
Squarespace Domains: Go to DNS, add CNAME record with Name “www” and Data from Substack
GoDaddy: Go to DNS Management, add CNAME with Host “www” and Points To from Substack
Cloudflare: Add CNAME with Name “www” and Target from Substack. Important: Turn off the proxy (gray cloud, not orange cloud)
Every registrar has a help doc for adding CNAME records. Search “how to add CNAME record [your registrar name]” if you get stuck.
Need more help?
For detailed instructions specific to your domain registrar, you can also check Substack’s official custom domain guide.
Wait for connection
12. DNS propagation time
After you add the DNS records in your registrar, go back to the Substack tab.
Substack will verify that your DNS records are configured correctly.
This process can take up to 36 hours.
Most of the time, it works within 2 to 4 hours.
13. You’ll receive an email
Substack sends you an email when your custom domain is connected and ready to use.
The email confirms that everything is working and your domain is live.
What to do while you wait
Don’t keep checking or refreshing.
DNS changes propagate in the background. Your clicking doesn’t speed it up.
Go do something else. Work on your first post draft. Read other Substacks. Take a break.
When the email arrives, your blog will be live at your custom domain.
Common issues during setup
“We couldn’t verify your domain”
Your DNS records might not be correct. Double-check:
Did you enter “www” in the Host field?
Did you paste the full Target URL from Substack?
Did you save the record in your registrar?
Wait 10 more minutes and check again. DNS takes time.
“Too many redirects” error
If you’re using Cloudflare, make sure the proxy is disabled on your CNAME record.
The cloud icon should be gray (DNS only), not orange (proxied).
“This site can’t be reached”
Your DNS hasn’t propagated yet. Wait longer.
Or your A record isn’t set up correctly. Check that you entered “@” for Host and the correct IP address.
“Your connection is not private” or SSL error
Substack is still generating your SSL certificate. This takes 10 to 20 minutes after DNS propagates.
Wait and refresh. The error will disappear once the certificate is issued.
Next step
Your custom domain is connecting to Substack.
Once you receive the confirmation email, your blog will be live at your own domain.
The next section covers how to verify everything works correctly and what to do once your blog is live.
Need more help?
For detailed instructions specific to your domain registrar, you can also check Substack’s official custom domain guide.
Common issues during setup
“We couldn’t verify your domain”
Your DNS records might not be correct. Double-check:
Did you enter “www” in the Host field?
Did you paste the full Target URL from Substack?
Did you save the record in your registrar?
Wait 10 more minutes and try again. DNS takes time.
“Too many redirects” error
If you’re using Cloudflare, make sure the proxy is disabled on your CNAME record.
The cloud icon should be gray (DNS only), not orange (proxied).
“This site can’t be reached”
Your DNS hasn’t propagated yet. Wait longer.
Or your A record isn’t set up correctly. Check that you entered “@” for Host and the correct IP address.
“Your connection is not private” or SSL error
Substack is still generating your SSL certificate. This takes 10 to 20 minutes after DNS propagates.
Wait and refresh. The error will disappear once the certificate is issued.
Next step
Your custom domain is connecting to Substack.
Now let’s verify everything works correctly.
Step 5: Verify your setup
You’ve connected your domain to Substack. Now let’s make sure it works.
Wait before testing
DNS changes need time to take effect.
Don’t test immediately after clicking Save.
Wait at least 30 minutes. Better yet, wait an hour.
DNS propagation happens in the background. Checking every two minutes won’t speed it up.
Go make coffee. Take a walk. Answer some emails.
Then come back and test.
Testing your domain
1. Open a new browser window
Use incognito mode or a private window. This avoids any caching issues.
2. Type your domain into the address bar
Type www.yourblog.com (with the www)
Hit enter.
3. What you should see
If everything worked, you’ll see your Substack blog.
The URL in the address bar shows your custom domain.
Your publication name appears at the top.
You might not have any posts yet. That’s fine. You’re just checking that the domain loads.
4. Test the root domain
Now type yourblog.com (without the www)
Hit enter.
It should redirect to www.yourblog.com automatically.
If both versions work, your setup is complete.
Success indicators
Green padlock in the address bar: This means your SSL certificate is working. Your site is secure.
Your domain in the URL: Not yourhandle.substack.com. Your actual domain.
Your Substack loads normally: You see your publication, About page, and settings.
If you see all three, you’re done with the technical setup.
If it’s not working yet
Don’t panic. DNS takes time.
“This site can’t be reached” error
Your DNS hasn’t propagated yet.
Wait another hour and try again.
Most DNS changes complete within 2 to 4 hours. Some take up to 24 hours.
“Your connection is not private” or SSL warning
Substack is still generating your SSL certificate.
This usually takes 10 to 20 minutes after DNS propagates.
Wait 15 minutes and refresh the page.
Still shows yourhandle.substack.com
Your browser might be showing a cached version.
Clear your browser cache or try a different browser.
Try accessing your site from your phone (using cellular data, not wifi).
DNS_PROBE_FINISHED_NXDOMAIN error
Your CNAME record isn’t set up correctly.
Go back to your domain registrar and check:
Host field says “www”
Value field has the correct Target from Substack
The record is saved and active
Fix any mistakes and wait another 30 minutes.
“Too many redirects” error
If you’re using Cloudflare as your DNS provider, the proxy needs to be disabled.
Go to your Cloudflare DNS settings.
Find your CNAME record.
Click the orange cloud icon to turn it gray (DNS only, not proxied).
Save and wait 15 minutes.
Page loads but formatting looks broken
This is rare but sometimes happens during propagation.
Wait an hour. It usually resolves on its own.
Checking DNS propagation status
If you want to see if your DNS records have propagated globally, use a DNS checker tool.
Go to whatsmydns.net
Enter your domain.
Select “CNAME” from the dropdown.
Click search.
You’ll see a map showing which regions can see your new DNS records.
Green checkmarks mean propagated. Red X means not yet.
This is just for your peace of mind. You don’t need every region to be green before your site works.
When to contact support
If it’s been 48 hours and your domain still isn’t working, reach out for help.
Substack support: Email support@substack.com with your publication name and domain. Include screenshots of your DNS settings.
Your domain registrar support: If you think the DNS records aren’t saving correctly, contact your registrar’s support team.
Most setup issues resolve within a few hours. True technical problems are rare.
Your domain is live
Once your custom domain loads your Substack blog, the technical work is done.
No more DNS. No more settings.
Now you have a real blog at your own domain.
What this means
You can publish posts and they’ll appear at yourblog.com/your-post-title
People can subscribe at yourblog.com
Your About page lives at yourblog.com/about
Everything runs under your domain now.
The old URL still works
Your original yourhandle.substack.com URL automatically redirects to your custom domain.
Old links don’t break. Bookmarks update. Search engines recognize the change.
Anyone who visits the old URL gets sent to the new one.
Next step
Your blog is live. The technical setup is complete.
Now comes the important part: actually using it.
The next section covers what to do in your first week, how to write and publish your first post, and how to build a publishing routine that sticks.
Your blog is live. Now what?
Most guides end when the technical setup is done.
That’s where beginners get stuck.
You have a blog at your custom domain. The tech works. Now you need to actually use it.
Here’s your first-week roadmap.
Week 1: Your first post
Don’t spend a month planning. Start publishing.
Day 1: Write your first post
Open your Substack dashboard.
Click “New post” in the top right.
Write something simple.
Topics that work for first posts:
Introduce yourself and what you’ll write about.
“I’m starting this blog to explore [topic]. Here’s what I’m interested in and why.”
Share why you started this blog.
“I’ve been thinking about [topic] for years. I wanted a place to work through ideas publicly.”
Write about something you’re learning right now.
“I just learned [thing] and here’s what surprised me about it.”
Keep it short
300 to 500 words is fine for post number one.
You’re not writing a masterpiece. You’re getting comfortable with the publish button.
Format it simply
Use one H2 heading if you need to break up sections.
Keep paragraphs short. Three to four lines max.
One idea per paragraph.
Add a title
Make it clear and specific.
“Starting a blog about product design”
“What I’m learning about local SEO”
“Why I’m writing publicly”
Don’t aim for viral headline magic. Aim for clarity.
Hit publish
Don’t agonize over every word.
Write it. Read it once. Fix obvious typos. Publish.
Your first post doesn’t need to be perfect. It needs to exist.
Day 2: Set up your About page
Readers who like your first post will check your About page.
Give them something to read.
Go to Settings > Publication details
Scroll to “About page.”
Write three short paragraphs:
Who you are
“I’m Maria Rodriguez, a software engineer in Austin.”
Keep it to one or two sentences. Name and basic context.
What you write about
“I write about engineering leadership, remote work culture, and building better software teams.”
Be specific. List the actual topics, not vague categories.
Why someone should subscribe
“Subscribe to get one post every Tuesday morning. Practical ideas you can use at work, no fluff.”
Tell them what to expect. Frequency. Value. Tone.
That’s it
Don’t write your life story. Three paragraphs. 100 to 150 words total.
Save it.
Your About page is now live at yourblog.com/about
Day 3: Decide on a publishing schedule
Consistency matters more than frequency.
Pick a schedule you can sustain:
Once a week is solid. Pick a specific day.
Twice a week if you have time and ideas. Pick two specific days.
Daily is for professionals. Don’t start here unless you’re already writing daily somewhere else.
Put it in your calendar
Block 60 to 90 minutes every Tuesday morning (or whatever day you picked).
That’s your writing time. Protect it.
Tell your readers
Add your schedule to your About page or in your welcome email.
“New posts every Tuesday morning.”
This sets expectations and holds you accountable.
Day 4: Write your second post
Don’t wait a week.
Publish your second post within days of your first.
This proves to yourself (and future readers) that you’re serious.
If you don’t have a topic yet, try these:
A lesson you learned this week.
“I spent three hours debugging code yesterday. Here’s what I learned about [specific technical thing].”
A question you’re trying to answer.
“I’ve been wondering about [question]. Here’s what I’ve found so far.”
Something you wish you’d known earlier.
“Three years ago I made [mistake]. Here’s what I’d do differently now.”
Length: 400 to 600 words
You’re building a habit. Keep it manageable.
Write. Edit once. Publish.
Day 5 to 7: Share your first posts
Your blog exists. Now people need to know about it.
Email 10 people directly
Not a mass email. Individual messages to people who’d actually care about your topic.
“Hey [name], I started a blog about [topic]. Here’s the first post: [link]. Let me know what you think.”
Personal. Specific. Not spammy.
Post on one social platform
Pick where your audience already hangs out.
LinkedIn for professional topics. Twitter for tech and writing. Reddit for niche communities.
Share your post with context.
“I just published my first post about [topic]. Here’s what I learned: [link]”
Don’t post and ghost. Reply to comments. Start conversations.
Tell colleagues or friends
Mention it in Slack. Bring it up in conversation. Send it to your team.
“I’m writing about [topic] now. First post is up if you’re interested.”
Some will read it. Most won’t. That’s fine. You’re planting seeds.
Watch what gets responses
Pay attention to which topics get replies or questions.
That’s your signal for what to write next.
What not to do
Don’t spam every channel you can find.
Don’t post the same link five times in one day.
Don’t beg people to subscribe.
Share genuinely. With context. Once per platform.
End of week one
You’ve published two posts. Set up your About page. Decided on a schedule. Shared with a small group.
That’s more than most people who say they want to start a blog.
You’re past the setup phase. Now you’re a blogger who publishes.
What happens next
Week two and beyond is about building a routine.
Write consistently. Same day, same time, every week.
Learn what resonates. Check your Substack stats after each post. See what people actually read.
Iterate on your content. More of what works. Less of what doesn’t.
Keep your technical setup simple. Don’t add complexity. Just write and publish.
The next section covers how to build that publishing routine and grow your audience over time.
Building your routine
You published your first posts. The hard part is staying consistent.
Here’s how to build a writing routine that lasts.
Publishing consistently
Consistency beats frequency.
One post every Tuesday for a year beats three posts one week, then nothing for a month.
Pick a frequency you can sustain
Once a week is solid for most people. Pick a specific day.
Tuesday mornings. Friday afternoons. Sunday evenings. Whatever works with your schedule.
Twice a week is ambitious. Only do this if you already write regularly and have a backlog of ideas.
Daily is for professionals. If you’ve never published weekly, don’t start with daily.
Stick to it for at least 8 weeks
That’s 8 posts if you’re publishing weekly. 16 if you’re doing twice a week.
Eight weeks gives you enough reps to find your rhythm and see what resonates with readers.
Most people quit after three or four posts. Push past that.
Block writing time
Treat your writing time like a meeting you can’t skip.
Put it in your calendar. Set a recurring event. Protect it.
60 to 90 minutes is enough for most posts.
Finding topics
The blank page stops more bloggers than technical issues ever will.
Here’s how to always have something to write about.
Keep a running list
Open a simple note on your phone or computer. Title it “Blog ideas.”
Whenever something crosses your mind, add it to the list.
What to add:
Questions people ask you repeatedly.
“How do you [thing you’re good at]?” That’s a post.
Problems you solved recently.
“I figured out [problem] this week.” Write about how.
Things you’re learning right now.
“I’m learning [skill]. Here’s what surprised me so far.”
Opinions you have that differ from common advice.
“Everyone says [common wisdom]. I disagree. Here’s why.”
Stories from your work or life that taught you something.
“This happened last month. Here’s what it taught me about [topic].”
When you sit down to write, pick from the list
Don’t wait for inspiration. Choose a topic and start typing.
You’ll figure out what you want to say as you write.
Using Substack’s features
Substack has built-in tools to help you publish and grow.
Use them.
Email delivery
Every post can go out as an email to your subscribers.
In your post editor, look for “Email settings” before you publish.
Toggle “Send this post to all subscribers” to ON.
Your post publishes on your blog and lands in subscriber inboxes.
This is Substack’s main value. Built-in email newsletter. No separate tool needed.
Analytics
After you publish each post, check your stats.
Go to your dashboard. Click “Stats.”
Key metrics to watch:
Views: How many people read the post.
Open rate: What percentage of subscribers opened the email.
Clicks: If you linked to something, how many people clicked.
Don’t obsess over numbers when you’re starting. You won’t have much traffic yet.
But do notice patterns. Which posts get more opens? Which topics get more engagement?
Write more of that.
Comments
Turn comments on if you want conversation.
Go to Settings > Comments and enable them.
Reply to every comment in your first 10 posts.
This builds community. Shows you’re reading responses. Encourages more comments later.
Even if it’s just “Thanks for reading, glad this helped.”
Recommendations
Once you have 5 to 10 posts published, recommend other Substacks you actually read.
Go to Settings > Recommendations.
Add 3 to 5 publications in your niche or adjacent topics.
Why this matters: Many Substack writers recommend you back. That’s how their readers discover you.
It’s the closest thing Substack has to built-in distribution.
Subscriber settings
Set up a welcome email for new subscribers.
Go to Settings > Email settings > Welcome email.
Write a short intro:
“Thanks for subscribing. I write about [topic] every [frequency]. Here are three posts to start with: [link] [link] [link].”
This helps new subscribers know what to expect and gives them your best content immediately.
Building the writing habit
Technical setup is done. Publishing tools are ready.
The only thing that determines if your blog succeeds is whether you keep writing.
Make it easy to start
Lower the barrier to sitting down and writing.
Don’t wait for perfect conditions. Don’t require two hours of uninterrupted time.
Set a timer for 30 minutes. Write whatever comes out. Stop when the timer goes off.
Some posts will be shorter. That’s fine. Publish them anyway.
Don’t aim for perfect
Your fifth post will be better than your first post.
Your twentieth post will be better than your fifth.
You improve by publishing, not by endlessly revising one draft.
Good enough, published beats perfect, unpublished.
Track your streak
Keep a simple log. Mark each week you publish.
A visible streak motivates you to keep going.
Use a calendar, spreadsheet, or habit tracker app.
Connect with other writers
Find 5 to 10 other Substack writers in your niche or adjacent topics.
Subscribe to their newsletters. Leave thoughtful comments. Recommend their work.
Many will reciprocate. You’ll build relationships and cross-pollinate audiences.
Writing is less lonely when you’re part of a community.
What to do when you miss a week
You will eventually miss your publishing schedule.
Life happens. Work gets busy. Motivation dips.
Don’t spiral.
Missing one week doesn’t erase your previous work.
Just publish the next week. Pick up where you left off.
The worst thing you can do is quit entirely because you broke your streak once.
Your first 90 days
Here’s what success looks like in the first three months:
You published 10 to 15 posts. Not 50. Just a handful of consistent posts.
You built a small audience. Maybe 20 to 50 subscribers. That’s real people reading your work.
You know what topics resonate. You’ve seen which posts get engagement and which don’t.
You have a routine. Writing and publishing feels normal now, not scary.
That’s the foundation. Everything after this is just doing more of what works.
Next section
Your blog is live. You’re publishing consistently. Now let’s talk about growing your audience beyond your immediate network.
Growing your audience
Your blog is live. You’re publishing consistently. Now you want readers.
Here’s the honest truth about growth.
Realistic expectations
Your first 100 subscribers come from people you already know or can reach directly.
Friends. Colleagues. Your existing social media followers. People in communities you’re already part of.
After that, growth comes from:
Consistent publishing. People find you through your archive of posts.
Word of mouth. Readers share what resonates with them.
Substack recommendations. Other writers recommend you to their subscribers.
Search engine traffic. Google indexes your posts and sends people searching for your topics.
Social sharing. When you or others share your work on social platforms.
None of this happens overnight.
Month 1: You might get 10 to 30 subscribers. Mostly people you told directly.
Month 3: Maybe 50 to 100 if you’re publishing consistently and sharing your work.
Month 6: Could be 200 to 500 if you’ve found topics that resonate and get shared.
These numbers vary wildly based on your niche, network, and content quality.
But the pattern is consistent: slow start, gradual compound growth.
What to do in your first 90 days
Focus on these priorities in order.
Priority 1: Publish consistently
Nothing else matters if you’re not publishing.
One post a week. Same day. For 12 weeks straight.
That’s your main job.
Priority 2: Tell people directly
Don’t wait for organic discovery. Reach out.
Email your network: “I’m writing about [topic]. Here’s my latest post.”
Share on one social platform you already use.
Post in relevant communities (Reddit, forums, Slack groups) when your content genuinely answers questions there.
Don’t spam. Share when it’s helpful.
Priority 3: Respond to every comment and reply
Engagement builds community. Community builds growth.
When someone comments on your post, reply within 24 hours.
When someone shares your work, thank them publicly.
Early subscribers are gold. Treat them that way.
Priority 4: Recommend other Substacks
Find 5 to 10 other Substack writers in your space.
Subscribe to them. Read their work. Leave thoughtful comments.
Add them to your Recommendations in your Substack settings.
Many will recommend you back. That’s how their readers discover you.
Everything else is secondary
Forget about:
Complex SEO tactics
Paid advertising
Growth hacking schemes
Viral content formulas
Just write good posts and tell people about them.
Where growth actually comes from
Let’s break down the real sources of audience growth on Substack.
Direct outreach (Month 1 focus)
This is you actively telling people about your blog.
Personal emails to friends and colleagues.
Sharing in group chats or Slack channels.
Posting on social media where your network already follows you.
Mentioning it in conversations.
This gets you your first 20 to 50 subscribers.
Substack network effects (Month 2-3 focus)
Other Substack writers recommend you. Their readers subscribe to you.
You appear in Substack’s “Similar publications” suggestions.
People discover you through the Substack Reader app.
How to activate this:
Recommend other publications. Many reciprocate.
Cross-post or collaborate with writers in adjacent niches.
Engage with other Substack communities through comments.
This is Substack’s built-in distribution. Use it.
Search engine traffic (Month 3+ focus)
Google indexes your posts. People searching for your topics find you.
This traffic compounds over time. Old posts keep bringing new readers months later.
Substack handles technical SEO well. Clean URLs. Fast loading. Mobile-friendly. XML sitemaps.
Your job: Write clear titles. Answer real questions. Use natural language.
Don’t overthink SEO. Write for humans. Search engines will follow.
Social sharing (Ongoing)
Readers share posts that resonate.
One person shares your post on Twitter. Five people see it. Two subscribe.
Someone quotes your work in a newsletter. Ten more people subscribe.
A Reddit comment links to your article. Twenty people visit. Five subscribe.
You can’t force this. You create conditions for it:
Write posts worth sharing.
Make specific, useful points.
Have a clear perspective.
Tell good stories.
Word of mouth (Long term)
The best growth is invisible.
Someone mentions your blog in a conversation.
A colleague forwards your post to their team.
A friend texts your article to someone who needs to read it.
This happens when your content helps people solve real problems.
Tactics that work
Here are specific things you can do to grow your blog.
Write guest posts or collaborate
Pitch to write a guest post for a larger newsletter in your niche.
Or invite another writer to contribute to your Substack.
Both expose you to new audiences.
Answer questions in communities
Find where your audience hangs out. Reddit. Forums. Slack groups. LinkedIn discussions.
Answer questions genuinely. Link to your relevant posts when they help.
Don’t spam. Add value first.
Repurpose your content
Turn a post into a X thread.
Quote key points on LinkedIn.
Share takeaways in relevant Slack channels.
One post can reach multiple platforms.
Create content that answers “how to” questions
People search Google for:
“How to [solve specific problem]”
“What is [concept they don’t understand]”
“Best way to [accomplish goal]”
If your posts answer these clearly, search engines send you traffic forever.
Build an email signature
Add your blog link to your email signature.
“Read my latest on [topic]: yourblog.com”
Every email becomes a tiny promotion.
What doesn’t work
Save yourself time by avoiding these.
Posting the same link repeatedly
Sharing your post once per platform is fine. Five times is spam.
People tune out. Platforms penalize you.
Buying subscribers or using growth services
Fake subscribers don’t read. Don’t engage. Don’t convert.
You’re building an email list of real people who care. Quality over quantity.
Obsessing over design and branding
Your logo doesn’t grow your audience. Your writing does.
Spend 95% of your time on content. 5% on polish.
Writing for algorithms instead of people
Don’t stuff keywords. Don’t follow viral formulas. Don’t chase trends you don’t care about.
Write clearly about topics you understand. Readers feel the difference.
Waiting for perfection
Your tenth post will attract more readers than your first.
Not because it’s better written. Because you’ve built a body of work by then.
Publish. Learn. Improve. Repeat.
Measuring what matters
Check your Substack stats weekly, not daily.
Track these numbers:
Total subscribers: Are you growing? How fast?
Open rate: What percentage of subscribers read each post?
Most-read posts: Which topics get the most attention?
Referral sources: Where are new subscribers coming from?
Ignore these numbers:
Views from non-subscribers: Interesting but not actionable.
Comparison to others: Someone else’s growth rate doesn’t change yours.
Daily fluctuations: One slow day means nothing.
The compound effect
Growing your blog feels slow for months.
Then something shifts.
You have 30 posts in your archive. Google sends steady traffic to old posts. Other writers recommend you. Readers forward your work.
Suddenly you’re getting 10 new subscribers a week without actively promoting.
That’s compound growth. It takes 6 to 12 months to kick in.
But it only happens if you keep publishing.
Next section
You know how to set up your blog, publish consistently, and grow your audience.
The final section covers common questions and what to do as your blog matures.
Common questions
You’ve set up your blog. You’re publishing. Here are answers to questions that come up as you go.
Can I monetize with Substack?
Yes. Substack has built-in paid subscriptions.
You can offer paid tiers with exclusive content for paying subscribers.
When to add paid subscriptions:
Not on day one.
Build a free audience first. At least 50 to 100 subscribers. Preferably more.
People need to know your work is worth paying for before they’ll pay.
Publish consistently for 3 to 6 months. Build trust. Then offer a paid tier.
Common pricing:
$5 to $10 per month.
$50 to $100 per year (offer annual plans at a discount).
Business or professional newsletters charge more ($15 to $30 per month).
Start lower. You can always raise prices later.
What to offer paid subscribers:
Extra posts each week or month.
Longer, deeper analysis.
Access to a community discussion thread.
Early access to posts before they go public.
Q&A sessions or office hours.
The key: paid content should feel like a bonus, not the only valuable thing you create.
Free subscribers should still get real value. Paid is just more.
What if I want to leave Substack later?
You can export your content and subscriber list anytime.
Go to Settings > Export data.
You get:
All your posts (in various formats)
Your subscriber list with email addresses
Your mailing archive
Take that data to another platform. WordPress, Ghost, ConvertKit, or anywhere else.
Your custom domain stays with you.
Point it to your new platform. Set up redirects from old URLs to new ones.
Your links stay intact if you configure redirects properly.
Will I lose subscribers?
Some, probably. Not everyone will follow the move.
But your domain and email list are yours. The subscribers who care will migrate with you.
This is why owning your custom domain matters. You’re not locked into Substack forever.
Can I use Substack for business blogging?
Yes. Many companies use Substack for thought leadership, customer education, and content marketing.
It works especially well for:
Founder-led content. The CEO or founder shares insights publicly.
B2B newsletters. Industry analysis, tips, case studies for professional audiences.
Product updates and company news. Keeping customers informed.
Expert positioning. Showcasing your team’s expertise.
What Substack doesn’t do well for business:
Landing pages for products.
Complex sales funnels.
Heavy SEO-driven content strategies that need WordPress plugins.
Lead magnets and marketing automation beyond basic email.
If your blog is primarily a marketing tool with complex needs, you might outgrow Substack eventually.
But for publishing valuable content and building an audience, it works.
Do I need to write long posts?
No. Substack works for any length.
Short posts (300 to 500 words) work fine. Quick thoughts. Links with commentary. Brief updates.
Medium posts (800 to 1,200 words) are the sweet spot for most topics.
Long essays (2,000+ words) work when the topic deserves depth.
Write the length your topic needs.
Don’t pad short ideas to hit a word count. Don’t cut good ideas to stay brief.
Match the content to the idea.
Can I schedule posts in advance?
Yes. Write your post, then click the dropdown next to “Publish.”
Select “Schedule for later.”
Pick your date and time.
The post publishes automatically at that time.
This is useful if you write in batches or want posts to go out at consistent times.
What about SEO?
Substack handles the technical SEO basics well.
Clean URLs. Fast page speed. Mobile-friendly design. XML sitemaps. Proper heading structure.
Your job: Write clear titles and useful content.
Good title: “How to connect a custom domain to Substack”
Bad title: “My thoughts on domains”
Good content: Answers a specific question. Uses natural language. Includes relevant terms naturally.
Bad content: Stuffs keywords. Writes for robots instead of humans.
If you write clearly and publish consistently, search engines will find and rank your posts.
Don’t overthink SEO. Focus on writing helpful content.
How do I know what’s working?
Check your Substack analytics every week or two.
Look at:
Which posts get the most opens. Those topics resonate. Write more like them.
Which posts get shared or commented on. High engagement signals value.
Where new subscribers come from. Double down on those channels.
Your open rate trends. Going up means people like your content. Going down means adjust your topics or frequency.
Don’t obsess over:
Daily view counts. They fluctuate randomly.
Comparing yourself to other Substack writers. Their numbers don’t affect yours.
Vanity metrics like total page views from non-subscribers.
Use data to inform what you write next. Don’t let it paralyze you.
Should I add a podcast or video?
Only if you genuinely want to and have time.
Substack supports podcast hosting. You can add audio to posts.
But adding another format doesn’t automatically grow your audience.
It divides your attention.
Master writing and publishing first. Add other formats later if they serve your goals.
Can I have multiple authors?
Yes. Go to Settings > People.
Add team members as writers or editors.
Useful if you’re running a company blog or collaborating with a partner.
Each author can publish under their own name.
What if I want to change my domain later?
You can swap domains anytime after paying the initial $50 unlock fee.
Buy your new domain. Add it in Substack settings. Update your DNS records.
Substack will redirect your old domain to the new one if you keep both active temporarily.
Or just let the old domain expire and move fully to the new one.
The $50 fee was for the feature, not the specific domain. Swapping is free.
Do I need to worry about email deliverability?
Substack handles this. Their emails have strong deliverability.
Your job: don’t spam. Don’t email too frequently. Don’t use misleading subject lines.
Follow basic email best practices and Substack takes care of the technical side.
Can I import my email list from another platform?
Yes. Go to Settings > Audience > Import subscribers.
Upload a CSV file with email addresses.
Substack will email each person asking them to confirm their subscription.
Only people who confirm get added to your list.
This prevents you from importing people who never agreed to hear from you.
What’s next for your blog
You’ve set up your blog with a custom domain. You know how to publish and grow your audience.
Here’s what happens as you keep going.
Months 1 to 3: Build the habit
Publish consistently. Get comfortable with your voice. Find what topics work.
Months 3 to 6: Find your rhythm
You know what your audience wants. Your writing flows easier. Subscribers start finding you organically.
Months 6 to 12: See compound growth
Your archive of posts brings steady traffic. Recommendations and word of mouth kick in. Growth feels less forced.
After year one: Keep going
The longer you publish, the stronger your blog becomes.
More posts. More subscribers. More opportunities.
The work doesn’t get easier. You just get better at it.
Final thought
You now have everything you need to start a blog on Substack with your own domain.
The technical setup is simple. The DNS configuration takes 30 minutes. The ongoing maintenance is zero.
The hard part is the writing itself.
Sitting down every week. Finding something to say. Hitting publish even when it feels rough.
That’s the real work. The tech was never the obstacle.
You’ve removed every technical excuse.
Now just write.
Final thoughts
Starting a blog doesn’t have to be complicated.
You don’t need to learn WordPress. You don’t need to manage hosting. You don’t need to install plugins or run security updates.
You need a domain, a Substack account, and the willingness to hit publish.
Everything else is noise.
The setup costs about $60 in year one
$50 one-time to unlock custom domains on Substack.
$10 to $15 for your domain name.
After that, $12 to $18 per year to renew your domain.
No hosting fees. No plugin subscriptions. No surprise charges.
The setup takes about 30 minutes
Buy your domain. Create your Substack. Unlock custom domains. Connect the two.
Then you just write.
What comes next is up to you
You can publish once a week for personal satisfaction.
You can build an audience of thousands and monetize with paid subscriptions.
You can use it for thought leadership, customer education, or career building.
The platform is the same. Your goals determine how you use it.
The only way this fails
You stop publishing.
Everything else is fixable. Bad posts get better with practice. Slow growth speeds up over time. Technical issues have solutions.
But if you stop writing, nothing else matters.
Your next step
Write your first post this week.
300 words. One clear idea. Hit publish.
Don’t wait for perfect. Start simple. Improve with reps.
Want more no-fluff tutorials on writing and growing with Substack?
Join the newsletter. I send one practical guide per week. No hype. No filler. Just clear steps you can follow.